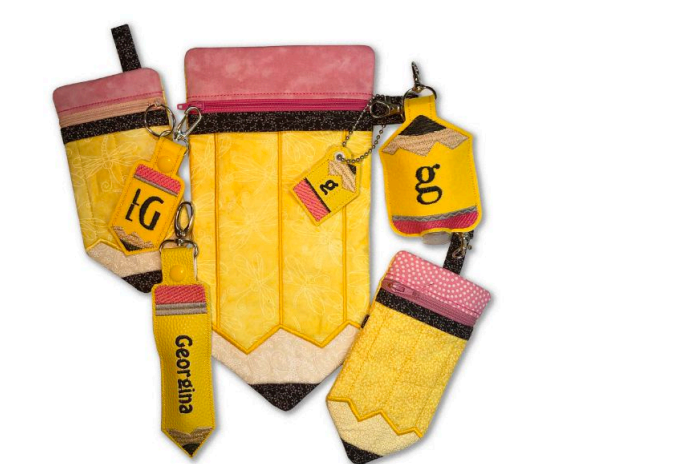
Who doesn’t love new accessories to start a new school year? Even in 2020, the “year of COVID-19,” with school being all weird, you can make it a celebration with the accessories included in this set.
The Back-to-School Accessories set has 6 projects:
- 2 projects for 100x100mm sewing fields
- 3 projects for 130x180mm sewing fields
- 1 project for 200 x 300mm sewing fields
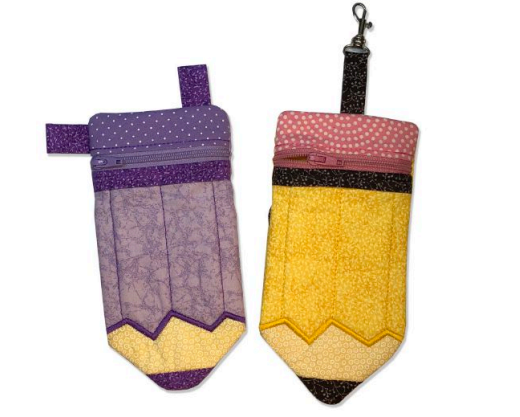
Two of these are the zipped pencil case designed for stitching with woven fabric. The 4 other projects are intended for vinyl, cork, leather, or felt.
This PDF covers the pencil cases. Both cases are constructed exactly the same. The only difference is the size.
The vinyl projects are covered separately.
Skill Level
While this project is simple, it has a lot of steps and you’ll need to pay close attention to what goes where and when. You may want to watch this YouTube video first: In-the-Hoop Pencil Case.

Please read through all instructions before starting your project! This project, while complex, is not really difficult because the embroidery takes care of all the construction. Cut and place carefully and you’ll have a successful result!

Resizing is not recommended!
What You’ll Need
- Suitable fabrics, pre-washed and pressed. I used quilt-weight cottons. (Tip: If fabrics are especially soft, starching can reduce distortion when stitching if you aren’t applying interfacing.)
- Rotary cutter, quilting ruler and mat
- Stabilizer: I used Sulky Soft ‘n Sheer.
- Batting: I used Warm and Natural
- Fusible interfacing: I used Pellon ShirTailor
- Steam-a-Seam 2 for appliqué
- Steam-a-Seam 2: 1/4’ wide hem tape
- Wonder Tape
- Polyester or nylon zipper, at least 2” longer than the width of your bag, color of your choice
- Scissors used:
- For trimming batting
- Thread snips
- Heavy scissors for final trim
- Optional bag hardware of your choice
- Suitable embroidery threads
- Tape (Scotch invisible, painter’s tape, or similar
Getting Started
You’ll need to do some prep work before starting the embroidery:
- Cut, press, and prepare all your fabrics
- Make any loops you might be adding
- Prepare the back pocket
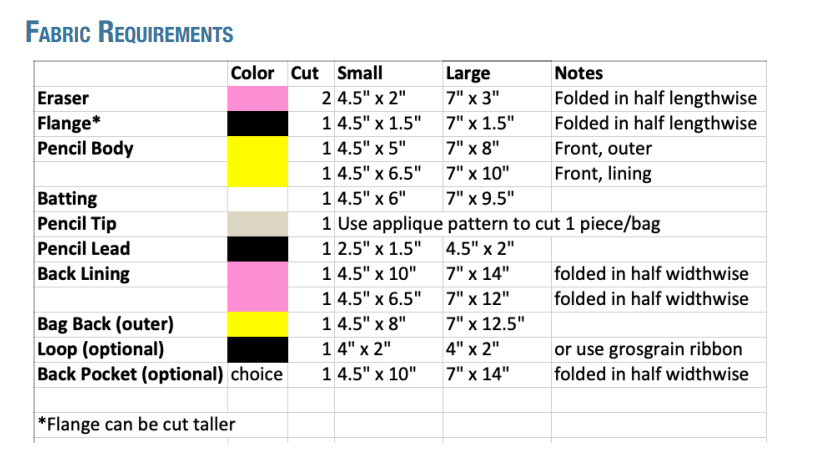
Fabric Requirements
Prepare All the Fabrics
- These bags, especially the smaller one, require only small bits of fabric. Raid your scrap bin!
- Medium weight cottons or cotton/poly blends work best.
- Cut fabrics on grain, paying attention to any directional prints. A rotary cutter, ruler, and mat are easiest.
- Press all fabrics smooth (I prewash everything).
- Starching or interfacing your fabrics can make them easier to keep flat in the hoop. Interfacing all pieces can make your bag harder to turn. Starch smaller pieces. For the small version, I only interfaced the bag back piece.
- Fusible interfacing can be applied to selected pieces for a more professional finish. For the large bag, I interfaced the front eraser piece, the front lining, the back panel, and the pocket.
- I used Warm and Natural batting on the lower front panel only. I interfaced the top front piece and the back panel. If you aren’t including batting in your version, I suggest you also interface the lower front outer piece.
- Note for Small Version: To minimize bulk on the smaller one, consider skipping some of the interfacing, not fully lining the pocket (or skipping the pocket addition altogether), and not using doubled fabrics for the back lining. See the video for tips.
Make Loops
Loops are totally optional. You can make them any length and place them on the side or the top in the eraser area (from just below the zipper on either side). This is where a reinforcing stitch is included. Loops can be placed elsewhere but they will only be stitched down by the final seam line. You may wish to add some stay stitching at the sewing machine before turning right side out.
- TIP 1: If you add the flange, make sure the loop does not overlap it to avoid too much bulk in one area.
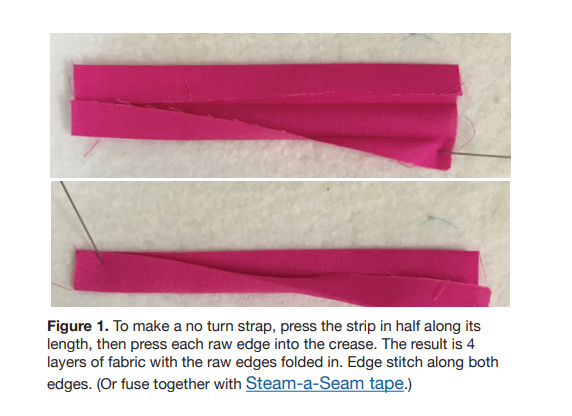
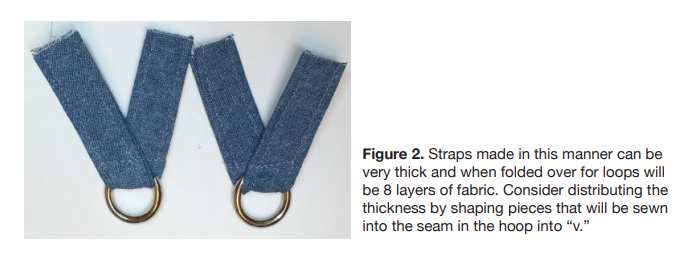
- TIP 2: You can reduce bulk by not stacking the ends of your loop together and instead place them side-by-side. (See following images…)
- TIP 3: If you are making a loop long enough to use as a handle, consider adding interfacing to the inside of the loop to make it more durable.
To determine the length, decide how long the loop should be, for example 2”, double that and add ½” for the seam allowance. A little extra length is better and can be cut off later. You can add more than one loop.
If you’re using hardware, determine the width by measuring the opening. Your fabric width needs to be slightly less than four times that measurement to fill out the space.
Press the strip in half lengthwise. Then open the strip and press each long edge matching the raw edge to the center fold. Refold the piece and press well. Edge stitch the open side first then the folded sided. Or, fuse together with Steam-a-Seam tape.
Prepare Optional Back Pocket
The back pocket is totally optional and is another way you can customize this project.
The simplest way to prepare the optional back pocket is to just fold the length of fabric in half and interface. This way you can avoid using the sewing machine.
However, if you’re willing to go an extra step, cut two contrasting pieces for the pocket. Apply interfacing to the back of the front piece and stitch the two pieces together at the top (right sides together).
Instead of pressing the seam open, press the seam allowances towards the lining piece. Then fold the lining up and over the seam allowance for a contrasting band across the top of the pocket. Stitch in the stitch or fuse together with Steam-a-Seam tape.
•
TIP: The pocket works better on the larger bag. On the smaller one, it can add too much bulk at the pencil point. You can reduce the bulk by not interfacing the pocket and by cutting the lining shorter so that it does not extend all the way to the bottom.
Embroidering the Bag
This project has a lot of steps that must be done in the right order for a successful result. Pay attention to when and where pieces are placed and whether they go face down or face up and on which side of the hoop.
- Note: The color sequence list includes many colors. This is to get the machine to stop. You can use whatever colors work best with your project. On the purple pencil I made in the video, I used only one color of purple. In the steps below, I included the color I used for the yellow pencil bags.
- TIP: Lining pieces are placed on the BACK/BOTTOM of the hoop; outer pieces are placed on the FRONT/TOP of the hoop.
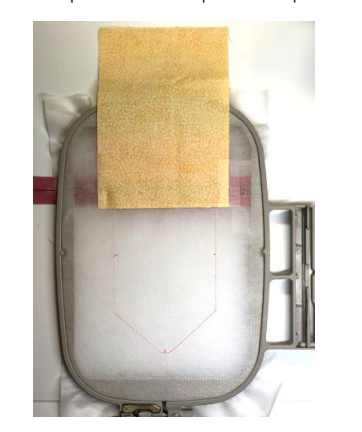
1. Setup:
- Hoop the stabilizer and stitch color 1 for a placement guide.
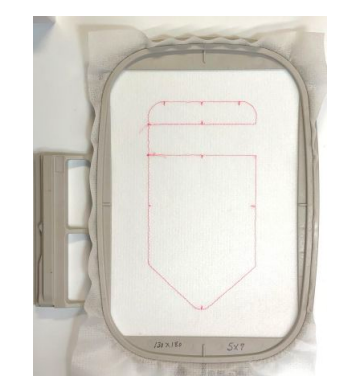
- The final stitching line will be 1mm within this line. [PINK]
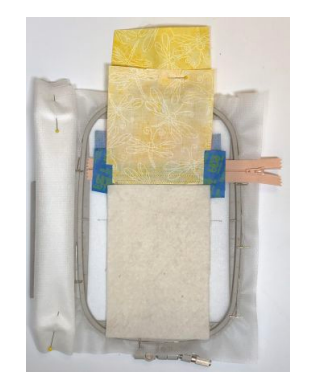
2. Zipper:
- Apply Wonder Tape to stabilizer next to the zipper placement guides and position zipper
- Make sure the metal ends are outside of the stitching lining. Zipper can open from either side you choose and must be place right side up.
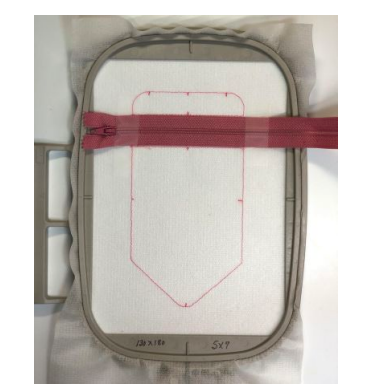
- Stitch color 2 to attach zipper to the stabilizer. [PINK]
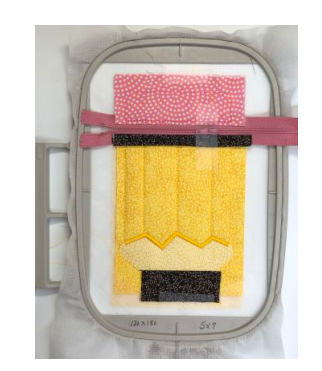
3. Eraser:
- Apply pieces, face down, matching raw edges to edge to zipper tape on both the front and back. Hold in place with a few pieces of tape.
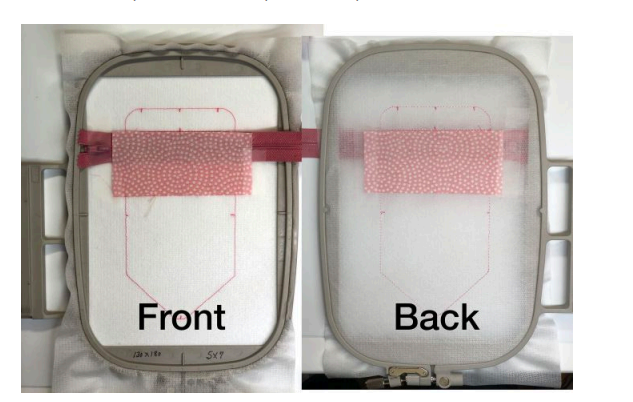
Sew color 3. [PINK]
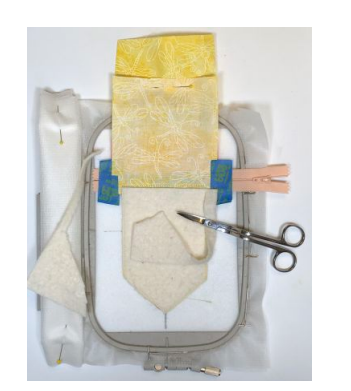
- Fold pieces both pieces back, finger press, tape to secure, and sew color 4 to topstitch and baste to the stabilizer. [PINK]
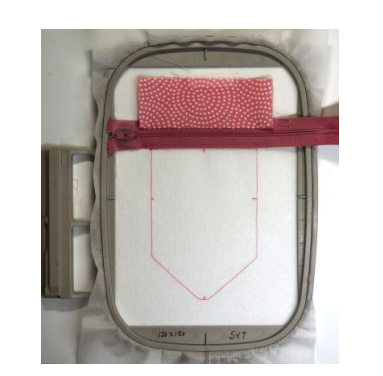
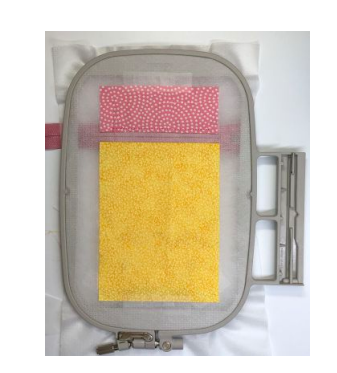
- 4. Pencil Body:
- Apply lining piece, face down, matching raw edges to edge to bottom edge zipper tape on both the back. Hold in place with a few pieces of tape.
Sew color 5. [YELLOW]
- Optional: Place flange matching the raw edges to the placement guide (bottom edge of zipper). Secure with tape. I used Wonder Tape to make sure it stayed straight.


- Apply front piece, face down, matching raw edges to edge to bottom edge zipper tape on the front. Hold in place with a few pieces of tape.

- Sew color 5. [YELLOW]
- Position batting so that the top edge abuts the seam edge, not the seam line
- Sew color 6 [YELLOW] to secure batting. Remove the hoop and trim the batting next to the stitching line to minimize bulk in the seams later on.
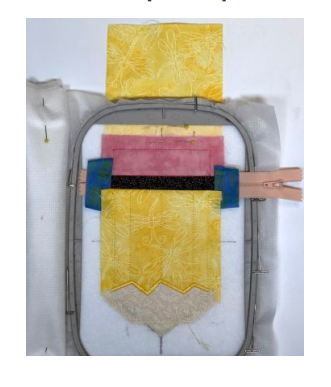
- Fold the front bag body piece down while keeping flange and lining still up out of the way.
- Sew Color 7 [YELLOW] to attach front piece to the stabilizer and sew the lines on the pencil body
- Trim off excess fabric below zigzag placement line to reduce fabric bulk at the pencil tip.
- TIP: If you want to add in another design, such as a name or monogram, here’s the place to insert it.
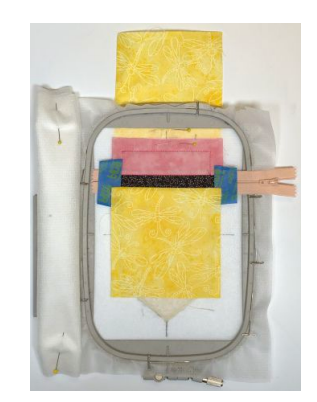
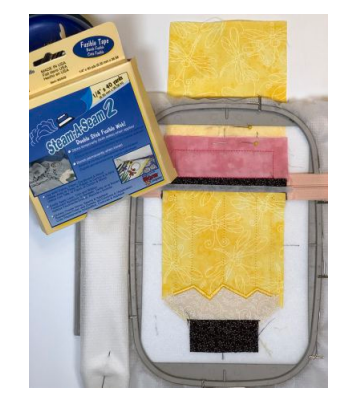
- 5. Pencil Tip:
- The “wood” part of the pencil tip is an applique. Position the applique matching the zigzag edge to the placement line and sew color 8 [YELLOW] to tack it down.
- 6. Pencil Lead:
- Place the small back fabric face down aligning the raw edge just beyond the “wood” applique edge.
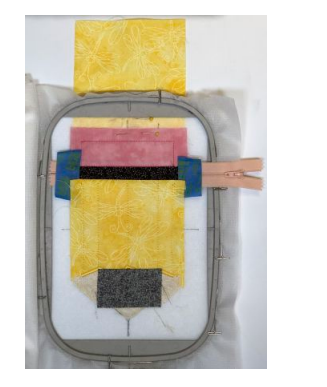
- Sew color 9 [Black] to attach it.
- Fold the fabric down, finger press it and secure it in place. 7. Top Stitch the Flange & Lining:
- Apply Steam-a-Seam tape to the back of the flange near the seam line. Fold it down and press with an applique tacking iron to secure it.
- Fold down the front bag lining on the back of the hoop, finger press, and secure in place.
- Sew color 11 [BLACK] to topstitch next to the zipper
- 8. Move the Zipper Tab:
- Open the zipper so that the tab is within the body of the bag and the zipper is about 3/4 open.
- IMPORTANT: If you skip this step, you won’t be able to turn your bag right side out! 9. Tabs:
- If you have any loops or tabs, you can place them now so that they can be reinforced stitched. Fold the loop in half and place it with the raw edges at least 1/4 beyond the placement line.
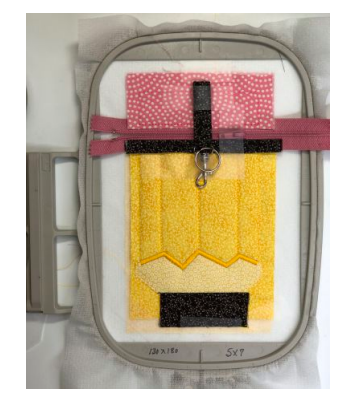
- Be sure to slide on any optional hardware. Make sure any hardware is out of the range of the needle and presser foot!
- Reinforcing stitches run up, across, and down on the upper section only. If you aren’t adding any tabs or loops, you can skip this color change. Sew color 12 in any color.
- TIP 1: If your tab is thick, rather than tack both ends together, place them side by side.
- TIP 2: If you place your tape (cellophane or painter’s), right over the stitching line, you can create a sort of “ramp” that will help your presser foot ride up and over rather than “trip” and catch on a suddenly thicker area.
- TIP 3: Avoid placing tabs over areas that are already thick, such as the flange area.
- TIP 4: The more “stuff” you pile on top of the hoop (loops, hardware, etc.), the bigger your back piece will be relative to the front as it must go over all the extra bulk. While we can compensate for this at the sewing machine by matching the edges of our fabric, that can’t be done in the hoop. You will get extra fabric visible on the back; it’s less prominent on the larger bag.
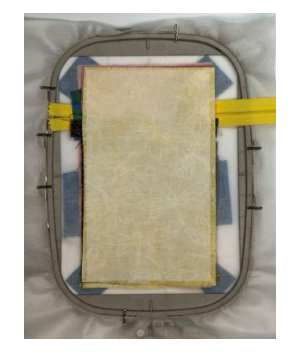
- 10. Final Assembly:
- On the back of the hoop:
- The back lining is layered on the back. Layer the top piece face down and the bottom piece face down overlapping the finished/folded edges about 1/2”. Tape in place.

- TIP: Apply a strip of Steam-a-Seam tape to the front bottom edge of the top lining piece but do not remove the protective paper until the bag is completely turned. The strip should be ~1” narrower than the width of the bag and be centered.
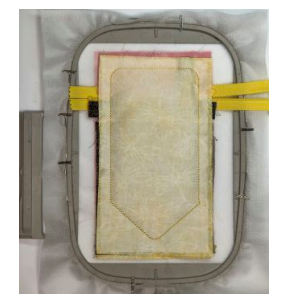
- On the front of the hoop:
- If you are adding a back pocket, place it face down with the finished edge at the top, keeping it below the zipper and making sure it extends beyond the original placement lines at least 1/4”. Secure with tape.

- Layer the back piece face down and secure with tape
- Sew the last color change. (YELLOW]
- Remove any tape and pins you may have used
Finishing:
- Remove the project from the hoop. Trim off excess beyond the final seam line leaving about a quarter inch seam allowance. You can clip corners and trim them more closely.
- Turn inside out through the opening in the lining. At this point your project will be inside out. You can seal the opening with a fusible web or hand stitch.
- Trim the stabilizer away from the back of the zipper. This is the only visible stabilizer in the project

- Turn the project one more time through the zipper opening. If the pocket is on the front, just turn it so that it’s on the back.
- Take some time to push out all the corners and the press
Summary
As you can see by the purple pencil made in the video, you can make your bags in any color combination. Also, if you are experienced with software, you can add a monogram, name, or other embellishment to the front of the bag. Just be sure to stitch it before you bring down the lining piece