


What you’ll need
- 6 ½ yards Daisy Border fabric: “Benartex-Kanvas Studio-Daisy Delight-Daisy Border, Blue”
- Creative Grids 60°-12” Ruler
- Embroidery thread for quilting design
- Sewing thread
- Batting
- Backing
- Contrasting fabric for binding flange
- Optional: clapper
- Arch template to trim corners
- Printed templates of the quilting design
- 505 Basting Spray
- For note card:
- Fabric scrap from table runner to fit 4” x 4” hoop
- Adhesive tearaway stabilizer
- Embroidery thread as stated in color sequence
- Heat ‘n Bond Lite
- Card with opening, and envelope
- Lace trim
- Glue gun and sticks
Featured Designs
https://www.grandslamdesigns.com/square-of-daisies-embroidery-design?variant=3
https://www.grandslamdesigns.com/square-of-daisies-embroidery-design?variant=2
https://www.grandslamdesigns.com/square-of-daisies-embroidery-design?variant=1
https://www.grandslamdesigns.com/daisy-embroidery-design?variant=1
Notes
- Though this project looks complicated, it is actually very easy to create!
- The borders on the fabric create the pattern.
- The fabric used for this project only had a border on one side.
- The 60° ruler is used to cut all the fabric pieces for the table runner.
- All seams are sewn at ¼”, with right sides together.
- After seams are sewn, set the seams and then press counter clockwise.
- Choose the quilting design size to fit the hoop size you have.
- Please read through all the instructions before beginning.
- Gather all the supplies.
- Embroidery thread may be used for quilting this project.
- Because only the border areas of the fabric are used, there will be a lot of beautiful fabric left over which may be used for the gift card plus other projects!
Preparation
- Choose a border fabric and coordinating solid for accent pieces
- This border fabric only has one deep border. Some fabrics have borders on two sides.
- If choosing a fabric with two borders, reconfigure the amount of fabric needed.
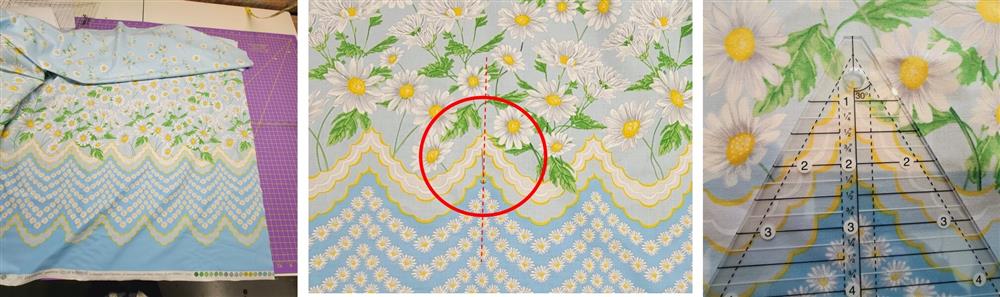
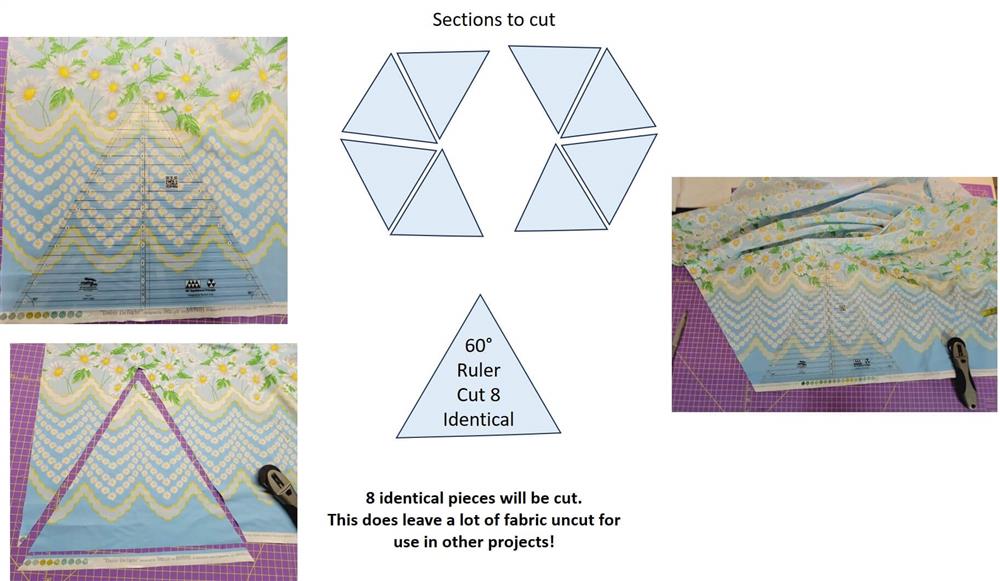
- The first step is to analyze the fabric and decide how the first eight (8) identical sections will be cut out of the border.
- Move the ruler around on the border to make that decision.
- The cuts must be made using the full 12” length of the ruler.
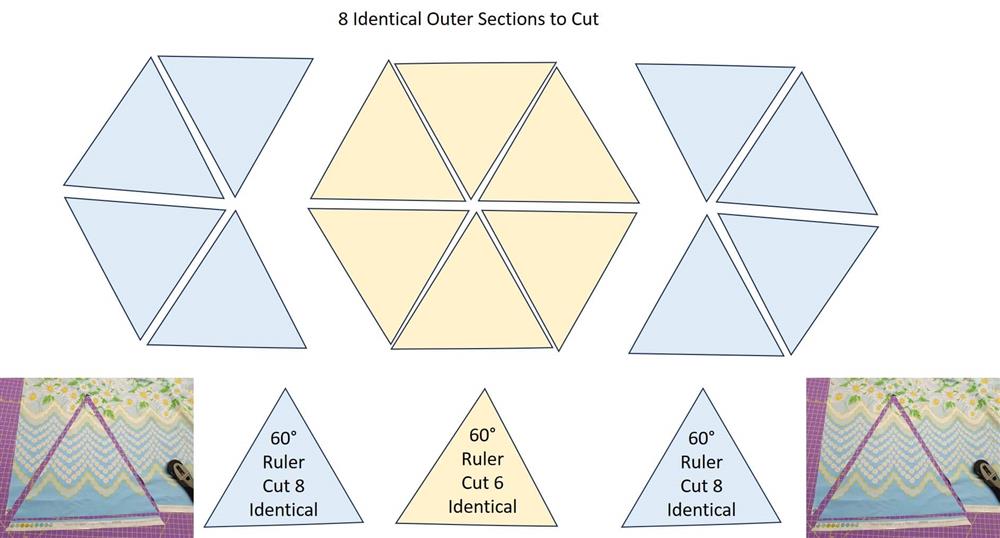
- It is probably easiest to use graphics to show generally how the sections go together.
- There will be eight (8) identical cuts made in the border using the 60° ruler.
- These pieces will be used for the four outside sections to the left and right sides of the table runner as indicated by the blue in the picture.
- There will be six (6) identical cuts made in the border using the 60° ruler for the middle sections, as indicated by the yellow in the picture.

- After cutting out all the pieces, they will be sewn together in sections.
- First the top and bottom blue sections will be sewn together as shown by the red arrows.
- Then the middle sections at the top and bottom will be sewn together as shown by the red arrows.
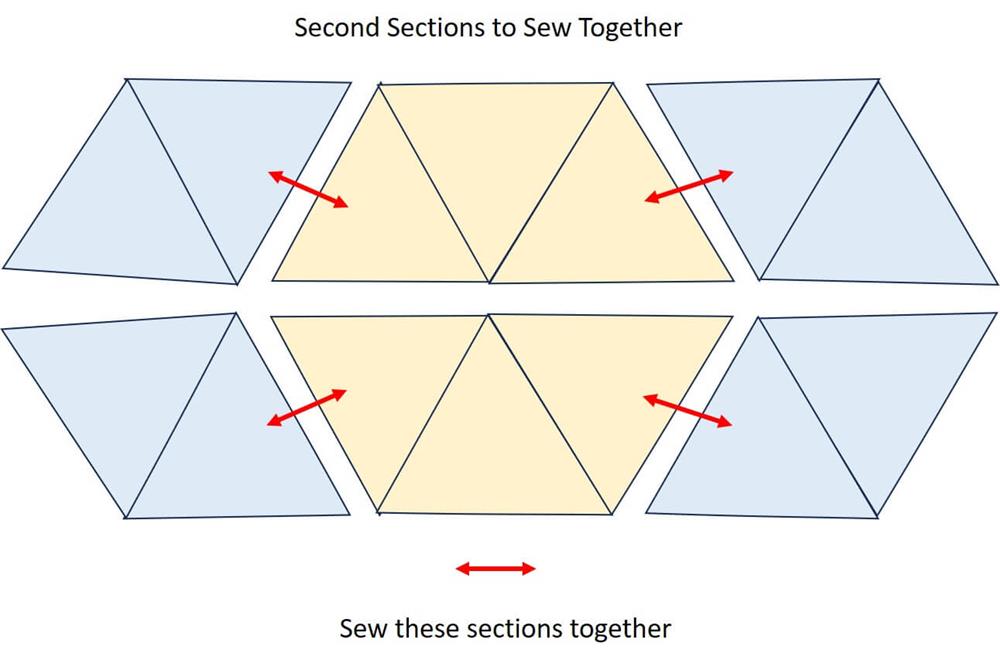
- The top section is completed by sewing the left blue section to the left yellow section, and the right blue section to the right yellow section as indicated by the arrows.
- The sequence is repeated for the bottom sections.
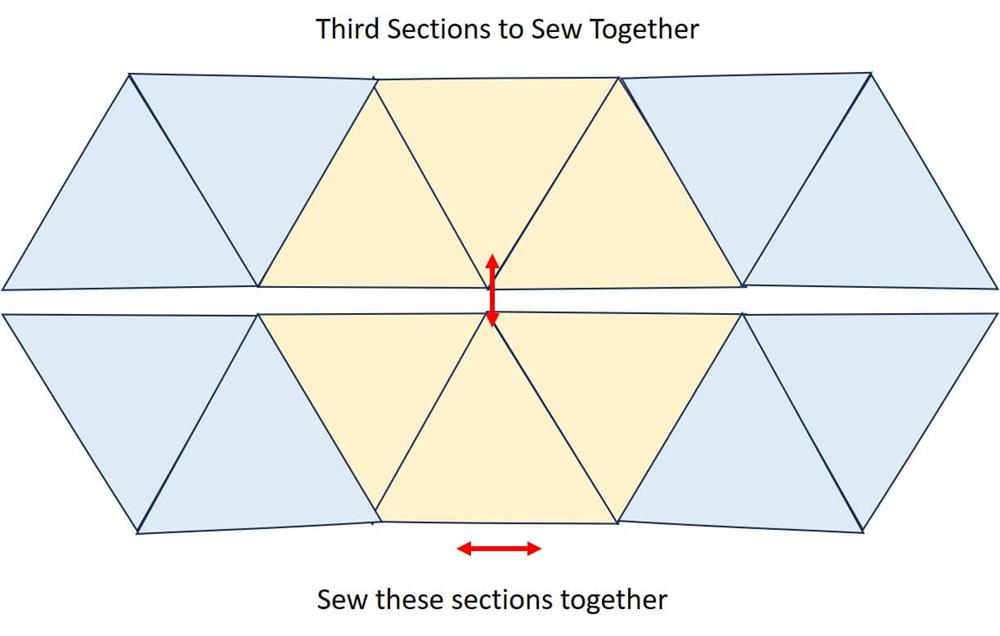
- To complete sewing together the table runner, the top and bottom sections are sewn together.
- Now let’s take a look at actual photos of creating the tablerunner.
- Again, this fabric has only one border; if using a double border fabric, then recalculate the amount needed.
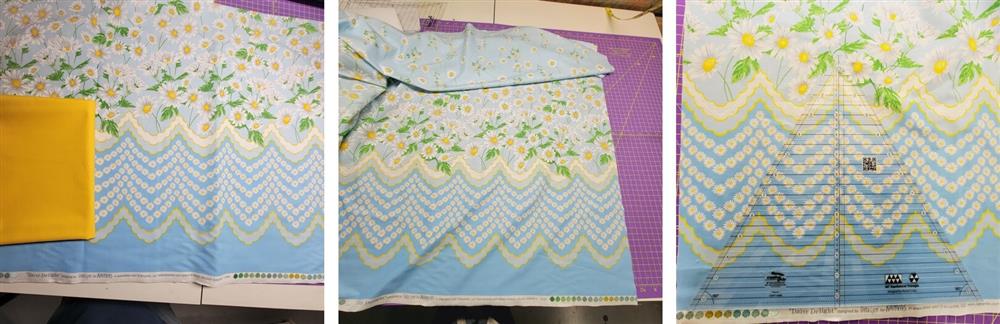
- Choose a prominent focus are of the fabric for the outer border sections.
- For this project, the peak of the point was chosen for the middle of the cut sections.
- Align the top of the rule, so that the peak of the print is just below the hole at the top of the ruler. This allows for seam allowance and turn of the cloth without cutting off that point when the sections are stitched together.
- Align the ruler’s center straight down through the points on the border as shown.
- Carefully align the center of the ruler to the points of the pattern.
- Because prints can be “off” a little bit and precise cutting is needed for this project, cut each of the eight (8) sections individually so they are all cut accurately.
- For each section, the ruler top was moved to every fourth point so the whole ruler would fit for each section to be cut.
- Accurately cut all eight (8) pieces for the left and right sections.

- Using the same techniques, cut the six (6) middle sections using the same ruler.
- This time, the bottom of the ruler was ½” below the bottom of the upper scallop; this allows for seam allowance and binding so the points won’t be cut off.
- Cut all six (6) sections accurately.
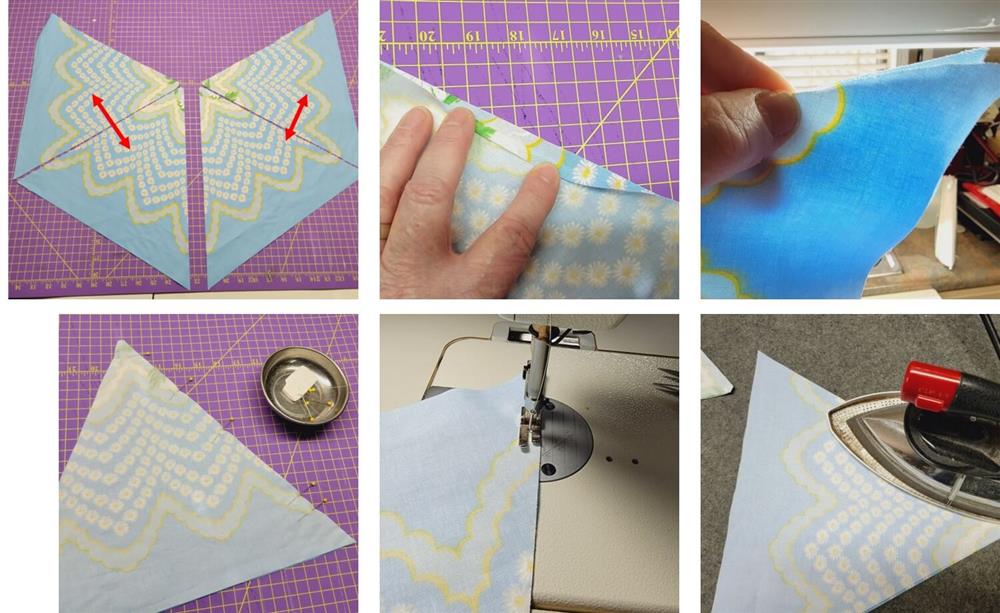
- Now will be to sew the sections together.
- Begin by looking at the graphic and the photos. Sew the two blue sections together.
- Be sure to match the prints at the seamlines.
- Sometimes holding the fabric up to the light will help in alignment.
- Pin the sections together.
- Sew the seam using a ¼” seam allowance, from the bottom to the top point.
- Press the seam to set the stitches.
- Press the seam allowances to the left.
- Sew sections in the upper left and upper right together, for both the top and bottom sections.
- The pieces should look like this.
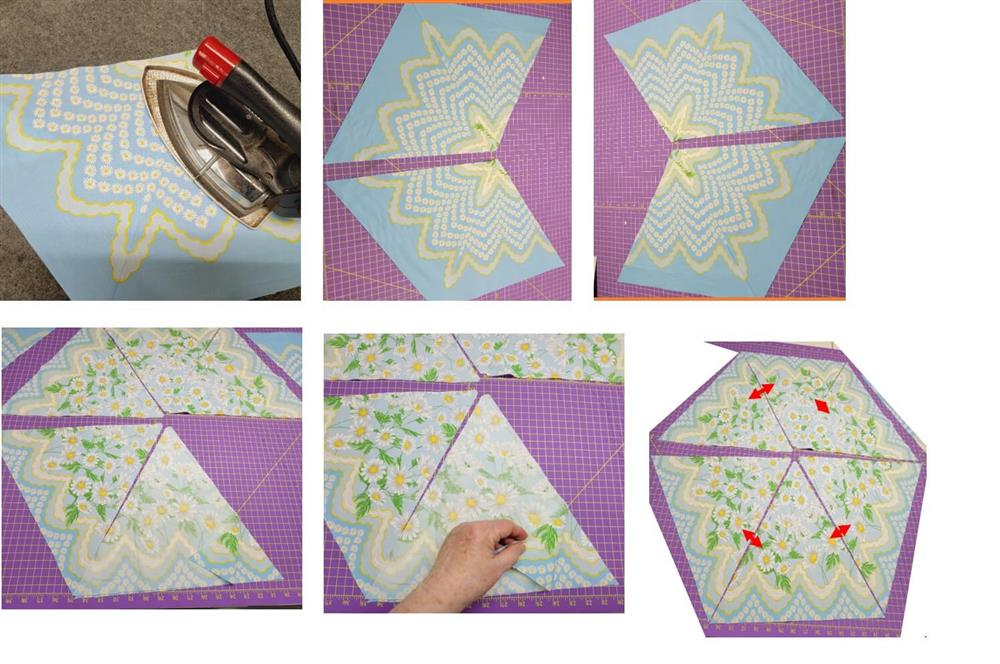
- Layout the middle sections.
- Sew the sections together as indicated by the arrows.
- Sew the top sections together.
- Sew the bottom sections together.
- Press to set the seams and then press each seam allowance to the left.

- Now pin the left and right sections to the middle section at the top, as indicated by the arrows.

- Before stitching the seams. open up the sections to make sure they are pinned together correctly.
- Sew the seams like before, and press the seam allowance to the left.
- To sew the center seam, place the top and bottom right sides together as indicated by the red arrows.

- When pinning the sections together, be sure to match seams and the prints.
- Sew the seam.
- Set the stitches and press the seam in the direction it wants to lay.
- Use a clapper to help make the seam nice and flat, especially in the center.
- This is how the table runner looks.

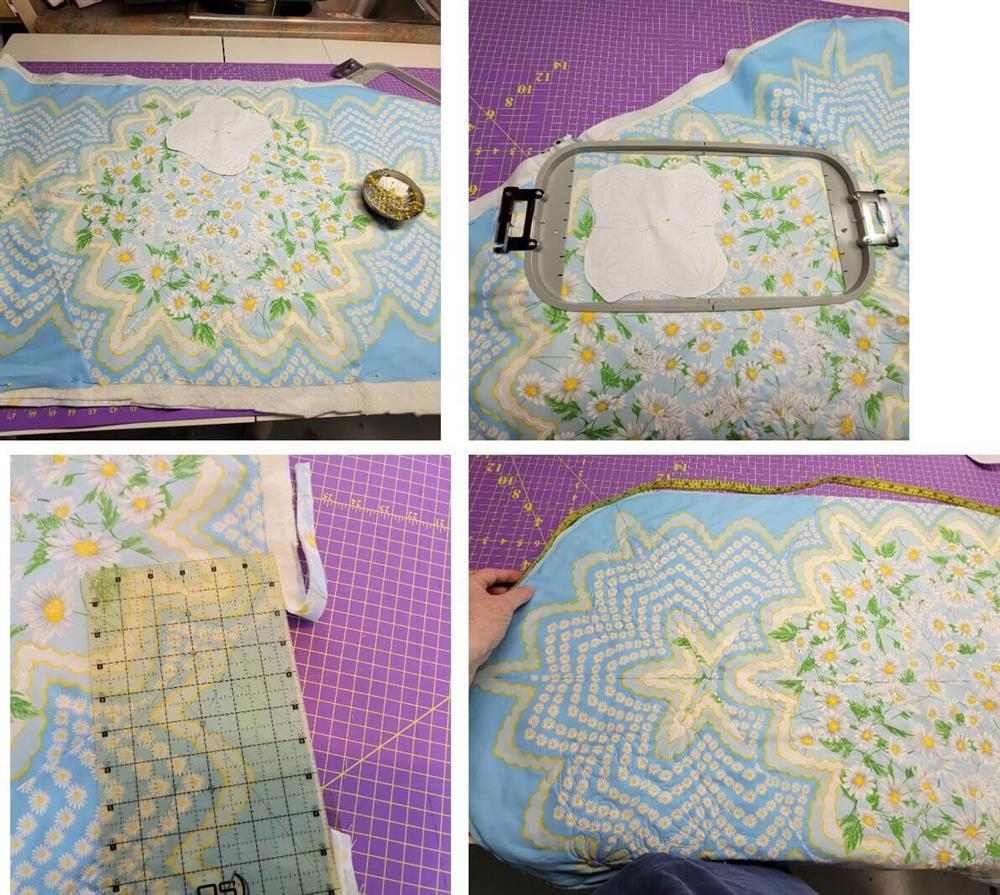
- To make binding a little easier, use an arched template to round the corners.
- Align the middle line of the template to the seam line, and the top outer edges of the template to the cut lines of the fabric.
- Draw around the top of the arc.
- Before trimming, secure the seam lines by sewing across the seams just inside the drawn line.
- Trim along the drawn lines at the corners.
- Plan the placement for the quilting using the printed templates.
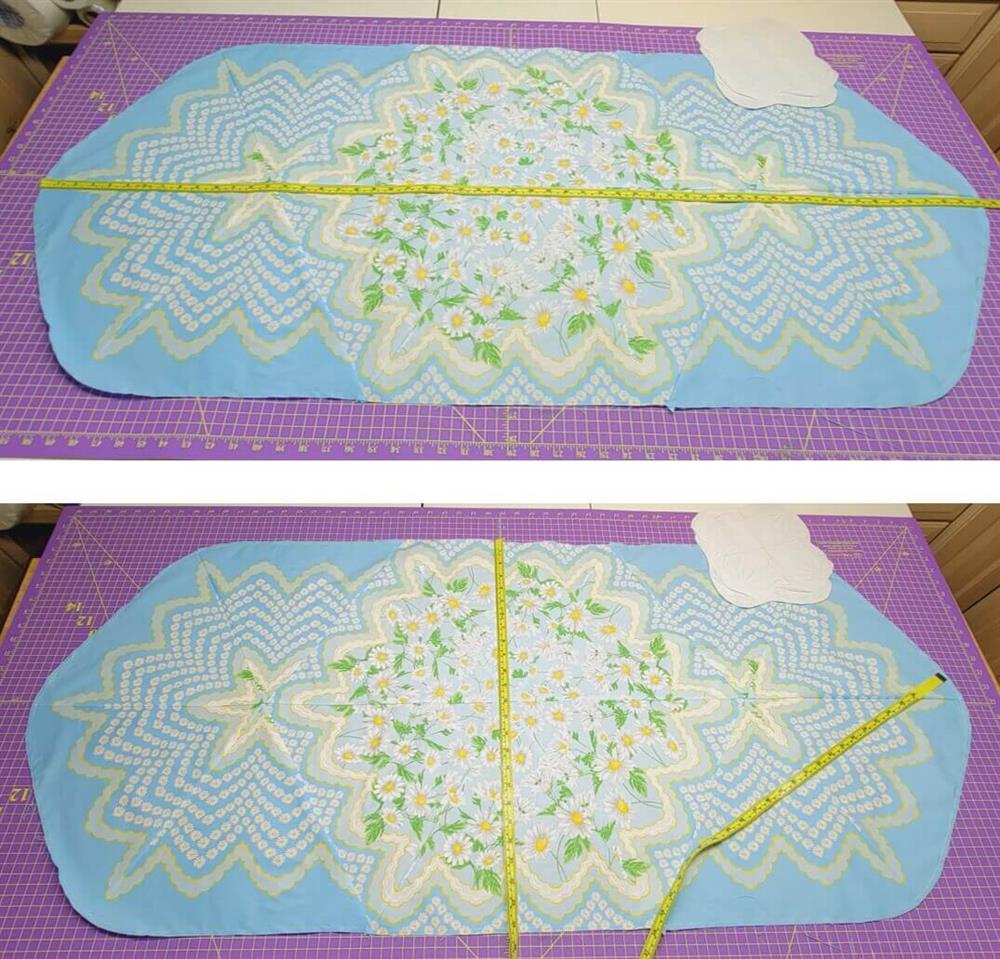
- Measure the length and width of the table runner, add 4” to each measurement to cut the backing and batting.

- From the remaining tablerunner fabric, cut the piece of backing.
- Cut the piece of batting.
- Sandwich the batting between the top and backing.
- Baste the layers together using 505 Temporary Spray Adhesive, or your favorite basting method.
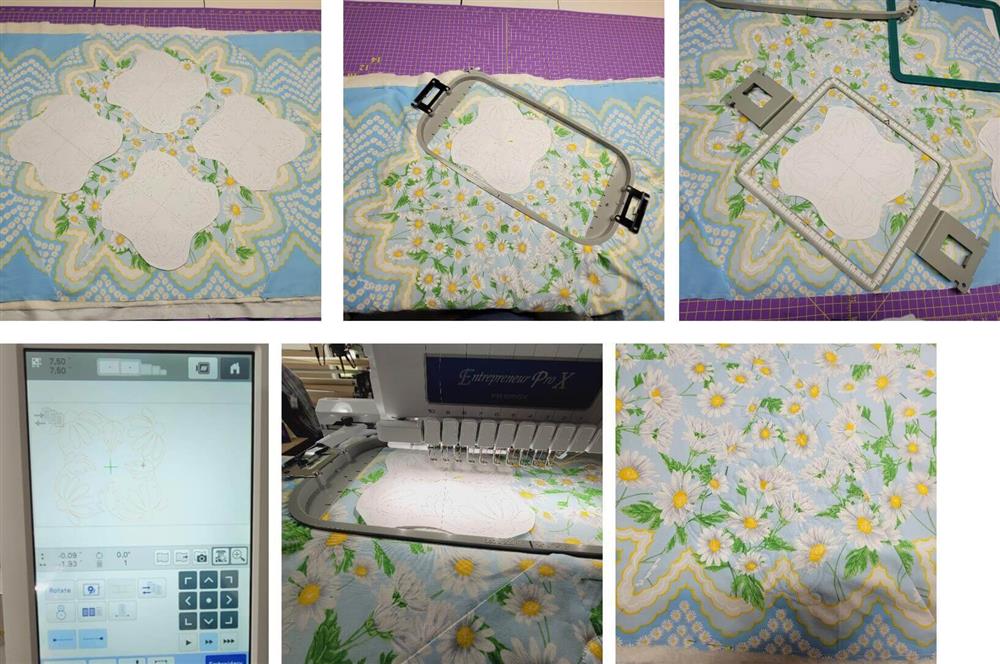
- Double check the placement for the quilting designs and if they need to be roated.
- For this project, the largest size quilting design was used and rotated to fit the layout of the table runner.
- The largest machine hoop was used, but the design could not be rotated in the hoop, so the hoop had to be placed on the table runner straight, so it would quilt out correctly on the table runner.
- If there is a magnetic hoop for your machine, that would be a good choice to use for this project!
- Quilt the table runner from the center out.
- Hoop the first section of the table runner to be stitched; hoop so that the majority of the fabric will be kept toward the front of the machine.
- Load the design and thread on the machine.
- Place the hoop on the machine.
- Be sure to keep the excess fabric out of the way so it doesn’t get caught under the hoop or in any part of the machine parts.
- Stitch the design….it only takes a few minutes!
- Remove the piece from the hoop.
- Plan the next placement, again, hoop the fabric so that the majority of the fabric is toward the front of the machine.
- Stitch.
- Continue hooping and stitching all the center sections, and then the outer section.
- After all the quilting is done, use a ruler to trim the batting and backing even with the table runner.
- Measure around the table runner and add 10” to cut the binding strips.
Final Steps

- Cut the fabric to make a flanged binding.
- From the leftover table runner fabric, cut 1.5” strips.
- From the accent fabric, cut 1.75” strips.
- Sew the strips together to make continuous strips of each color.
- With right sides together, sew the binding strips together; press the seam toward the printed fabric.
- Press the binding, meeting the long cut edges.
- About 1/8” of the contrast should show.
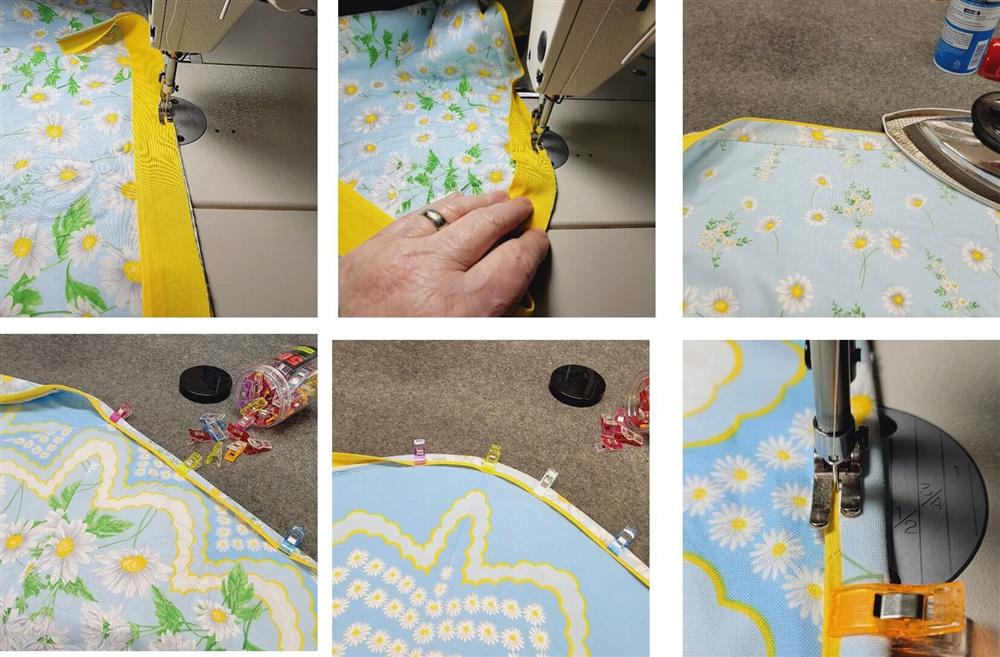
- With the contrast side facing up, sew the binding to the wrong side of the tablerunner.
- When rounding the corners, add a little ease to the inside of the strip so that when the binding is turned to the right side, it will lay flat and not cup.
- Using your favorite method, join the ends.
- Press the binding away from the table runner.
- Turn the binding to the right side and clip in place.
- Sew the binding down by stitching in the ditch between the print and contrast fabrics.
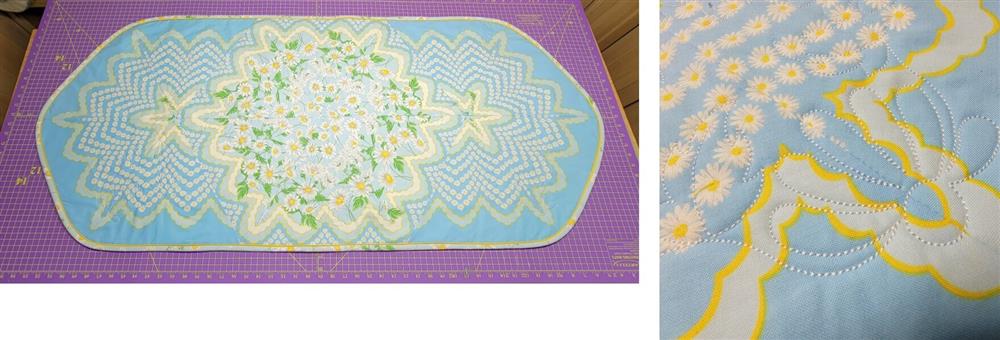
- This completes the table runner.
- The border print makes a beautiful piece that looks like it was complicated to sew together, when in fact, it is very easy!
- The embroidery design is a beautiful compliment for the table runner.
Stitch a Coordinating Gift Card!
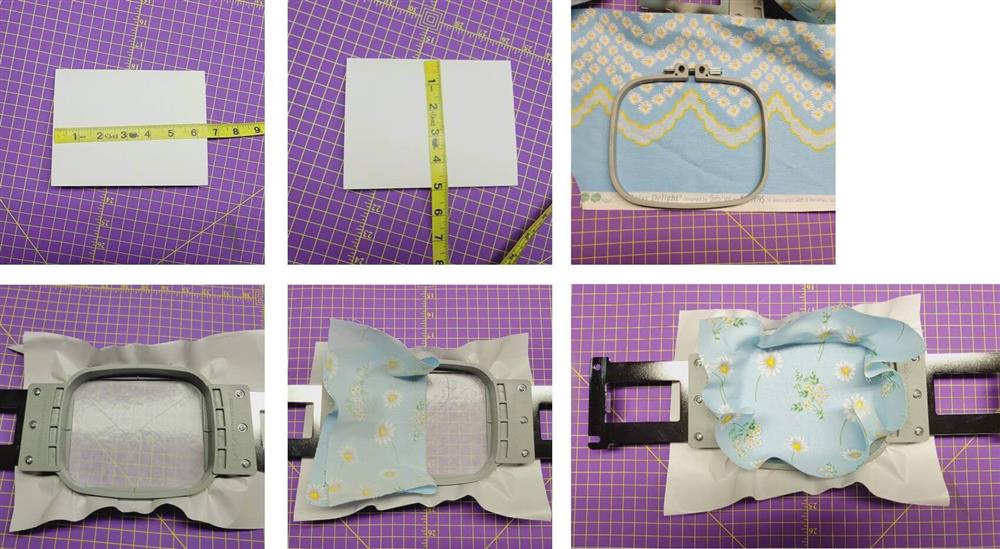
- Measure the card width and height.
- Choose a part of the leftover tablerunner fabric to stitch the daisy flower; cut the piece larger than needed for the front of the card from the measurements taken.
- Hoop a piece of adhesive tearaway stabilizer; remove the protective paper.
- Center and place the fabric in the hoop.
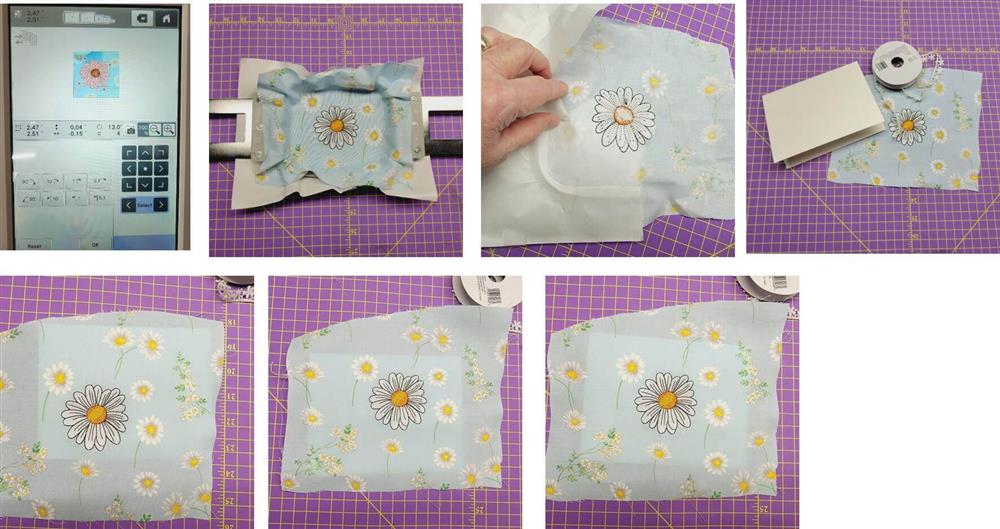
- Load the design and thread on the machine.
- This is a good time to use the machine camera to get precise placement of the design on the fabric.
- Stitch the design following the color sequence.
- Remove the fabric from the hoop and remove the excess stabilizer.
- Choose a daisy trim to accent the card.
- Move the fabric around on the front of the card to see where the best placement will be to incorporate not only the stitched design, but also the prints in the fabric.
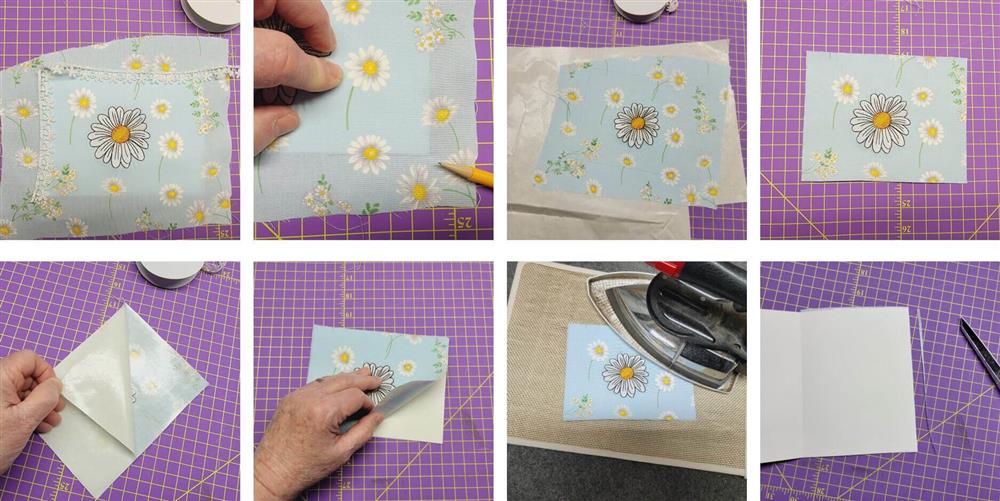
- Once the position is decided, use a pencil to trace around the card.
- Fuse a piece of Heat ‘n Bond Lite to the back of the fabric.
- Trim the fabric along the pencil line.
- Align the fabric to the front of the card and fuse in place, using a press cloth or iron shoe.
- If any of the fabric hangs over the edge of the card, trim the fabric.
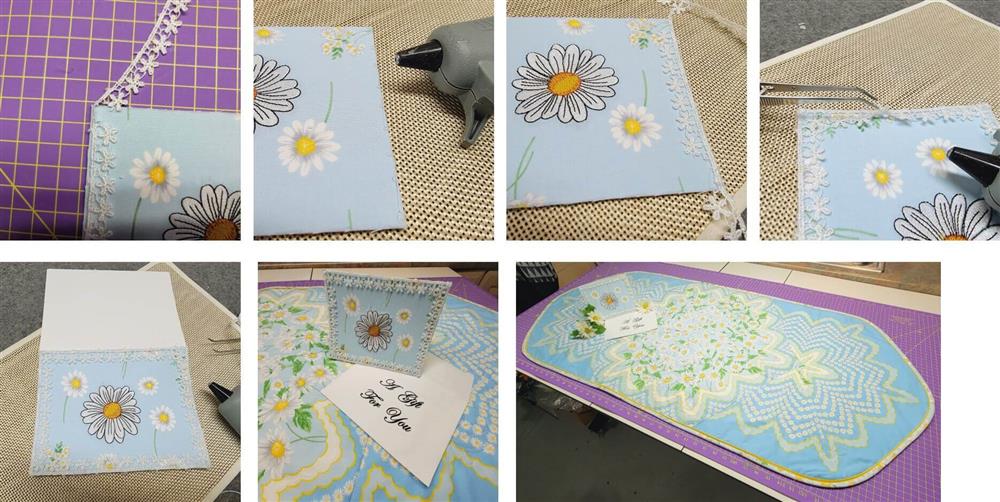
- Accent the outside edge of the card/fabric with the lace trim.
- Depending on the lace, small pieces may need to be cut away to be able to turn the corners.
- Use a glue gun to apply small dots of glue to the edge of the fabric and carefully place down the lace.
- Let the glue cool.
- Write or print on the front of the envelope.
- The table runner and card will make a beautiful gift!
Conclusion:
Congratulations! Whether for yourself or a gift, learning new ways to use embroidery designs increases your enjoyment of stitching. There is no doubt your project will be a “Grand Slam!”
By the "Grand Slam Designs" Team

