


What you’ll need
- 2- 9 ½” x 12 ½ ” Cotton fabric for outside and inside lining
- 2- 9 ½” x 10” Cotton fabric for inside pockets
- 1- 9 ½” x 12” Foam headliner
- Pellon sF101 to interface above pieces
- 1- cutaway stabilizer to fit hoop
- 2- 4” x 5” clear vinyl for inside pockets
- 4- 2 ¼” x 6” binding pieces for vinyl pockets
- 1- 7” polyester zipper for inside pocket
- 2- 2 ¼” x 9.5” binding pieces for large fabric pockets
- 12- 2 ¼” x 4” cotton fabric for tab closure
- 1- 1 ¾” x 4” foam headliner for tab closure
- 1- 1” x 1” hook and loop closure
- 2 ¼” strips to make 60” of binding to go around mini-folio
- Embroidery thread as stated in color sequence and to coordinate with fabrics
- Thread to quilt and sew mini-folio together (embroidery thread may be used)
In addition:
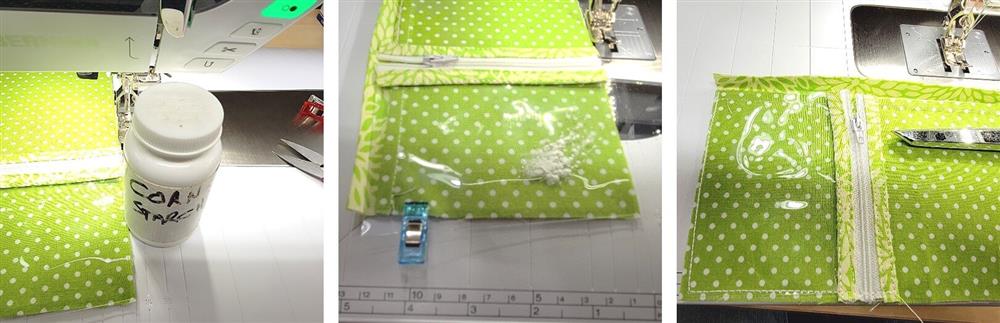
- Small amount of corn starch or Teflon foot for machine to aid in stitching vinyl
- 505 Temporary Spray Adhesive
- Embroidery software to add text to design (or may be done at the machine)
Featured Design
https://www.grandslamdesigns.com/birds-resting-on-branch-embroidery-design?variant=1
Other designs you may like:
https://www.grandslamdesigns.com/sewing-machine-and-quilt-embroidery-design
https://www.grandslamdesigns.com/fat-quarter-embroidery-design
Preparation

- Please read through the instructions before beginning the project.
- Gather all the supplies.
- Press the interfacing behind the front fabric, foam, and fabric pocket pieces.
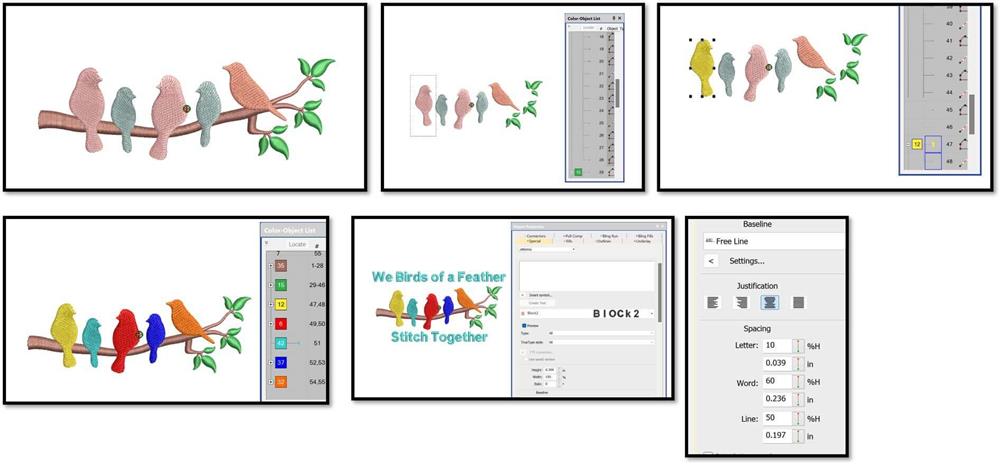
- In software, import the bird design.
- Ungroup the design if it cam in grouped.
- Using the color sequence docker, hide the brown branch so it is easier to select the birds.
- Select each bird and change to a desired color.
- Unhide the branch.
- Using the lettering feature in the software, add the text.
- Make the text no wider than the total size of the bird design so the finished design will fit within a 4” x 4” hoop.
- Save the file and export it for stitching.
- Test stitch the design, make any edits needed, so it is ready for stitching on the project.
- Print out the design and color sequence.
Machine prep, hooping, and stitching

- On the outer piece of interfaced fabric, fold in half and press in a crease.
- Fold the right side to the new crease and press to crease.
- On the right side, bring the top to the bottom and crease; this will create the center for stitching the design.
- Cut out the printed template; center and pin over the creased center marks.
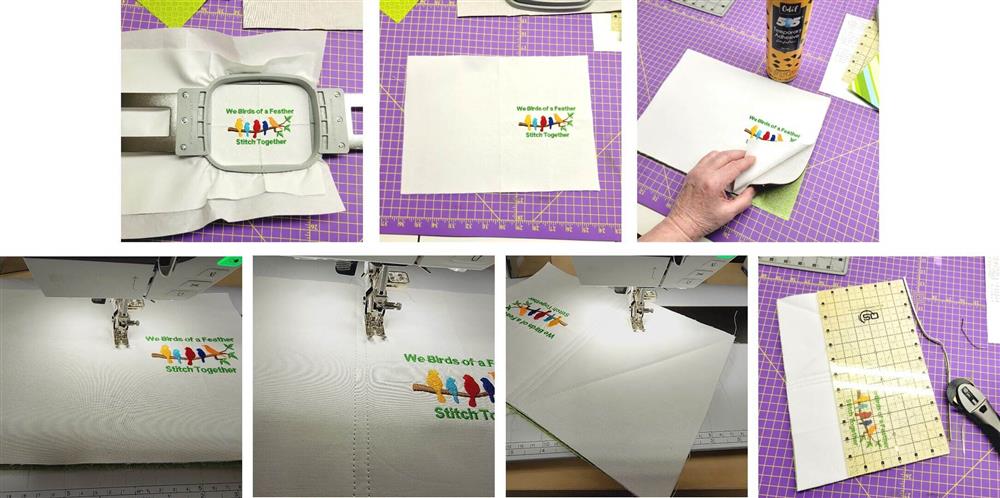
- Load the design on the machine and choose the colors.
- Hoop the right front fabric with a piece of cutaway stabilizer.
- Place the hoop on the machine, removing the paper template and pin.
- Be sure the machine centers over the center crease marks.
- Stitch the design following the color sequence.
Creating the inside pockets

- While the machine stitches, work on the inside pockets.
- Lay down the interfaced inside lining.
- Next will be to lay out the pieces so you’ll know where they will go.
- Press the interfaced inside pocket pieces in half and place one on the left and one on the right, with the folds going toward the center.
- Over the right pocket, the vinyl pockets will be placed.
- To begin the construction, take the two pocket binding pieces and fold them in half lengthwise; press to crease.
- Place the cut edge of the binding along the folded edge of each pocket.
- Stitch the binding in place on each pocket using a ¼” seam.
- Press the binding up.
- Turn the pockets over and turn the binding over the top of the pocket so the fold of the binding just covers the stitching line and press.
- Tip: use a clapper to help make the seams flat after pressing!
- Set the pockets aside at this point; the final binding stitching will be done in Step 8.

- The next step is to treat the zipper with binding strips just like was done for the pockets.
- Here a very long zipper was used and trimmed down; the recommended 7” zipper will be trimmed down, too, but do not do it until instructed.
- Take the two zipper binding strips and press the long edges together and press.
- Flip the zipper over.
- Place the cut edge of the binding to the top of the zipper tape.
- Sew the pieces together using a 1/8” seam.
- Press the binding up.
- Turn the zipper over and flip the binding over the zipper tape and press in place just over the stitching line.
- Repeat these steps for the other side of the zipper.
- Place a zipper foot on the machine and move the needle to the left so the stitching will just catch the folded edge of the binding.
- Stitch the folded edge of the binding in place on both sides.
- Move the zipper tab to about the center of the zip area.
- Trim off the top and end of the zipper even with the binding.

- The bound zipper will be sewn to the top of the lower right vinyl piece.
- Tip: to help keep the vinyl from sticking to the throat plate, place a post it note or white gift tissue under the vinyl
- Align the top of the vinyl piece to the underside, bottom binding as shown.
- Stitch the vinyl in place along the lower edge of the binding; remove the paper.
- Place the vinyl zip pocket and the lower edge of the right pocket and clip in place.
- Stitch the vinyl zip pocket to the right pocket at the top edge of the top binding, through all layers.
- Baste the vinyl in place along the right and bottom.
- Tip: use a Teflon presser foot if your machine has one. If not here’s a great little trick Take a small medicine bottle, make sure it is clean and place some corn starch in the bottle. Punch some holes in the cap.
- Sprinkle a very small amount of corn starch on the vinyl and smear it around the edges where the presser foot will stitch. The corn starch ever so lightly coats the bottom of the presser foot allowing easy stitching, and any remaining corn starch will wipe off easily!

- For the top vinyl pocket, bind the long edges like was done before.
- Place the bottom of the pocket about 1” above the lower pocket.
- Stitch the pocket in place and baste the side edges in place.
- Once the vinyl pockets are in place, the right pocket binding can be stitched in place.
- Stitch down the binding on the left pocket.
- This completes the steps for the inside pockets.
- By the time the pockets are completed, the embroidery should be finished.
- Remove the fabric from the hoop and trim the excess stabilizer; press.
- Sandwich the headliner foam, with the interfaced side up, between the embroidered fabric and interfaced lining piece.
- Baste around all edges to secure all three layers together.
- To make the folio easier to fold, stitch from top to bottom along the center creased line and then again ¼” away on each side through all layers.
- Do any other quilting you’d like; for this project, the back area just had an X stitched from corner to corner.
- Square up the piece.

- On the right edge of the outside, center the 1” soft part of the hook and loop tape and sew through all layers.
- Flip the cover over. Place the pockets in place as shown and clip all the layers together.
- Baste all the layers together.
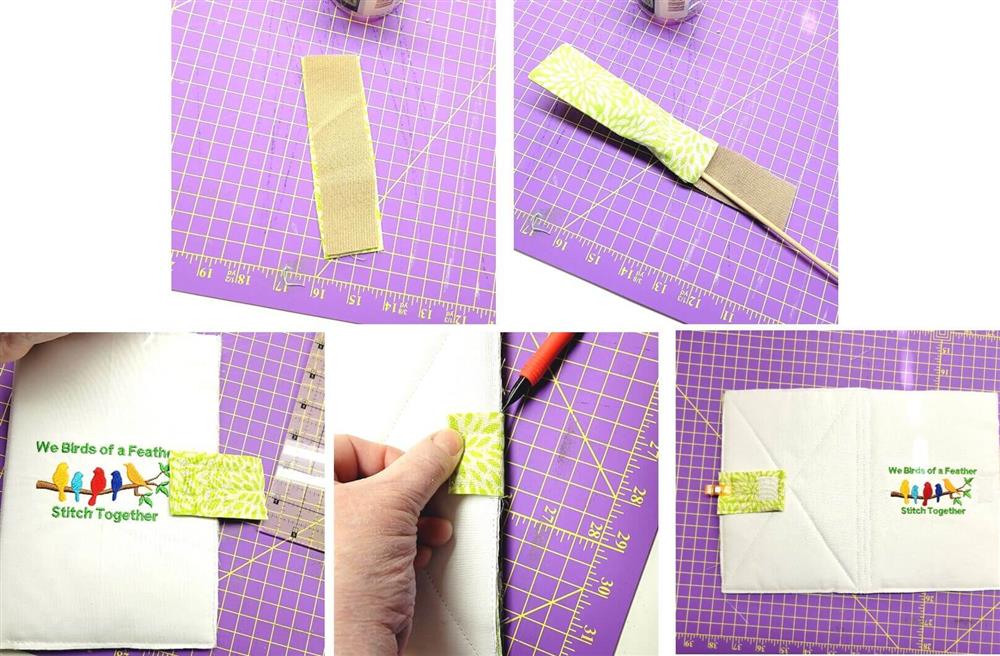
- Make the tab by placing the two pieces, right sides together.
- Stitch along the two long edges and one short edge using a ¼” seam allowance.
- Slide the foam piece inside the opening (using a chopstick helps scoot it in and into the corners.)
- On the underside, place center and place the hook end of the hook and loop tape on the stitched end.
- To figure out where to place the open end on the back side, place the hook and loop tape together.
- Fold the cut edge of the tab around to the back and place a tick mark on each side.
- Also, figure how much distance (about ½”- ¾”) open space to allow for the filling of the pockets.
- Trim the end of the tab to length.
- Clip the tab to the left side, with the hook side facing up and the cut edge between the tick marks; baste in place.

- Make the binding by sewing the strips together.
- Press the binding stitch in half.
- Leaving about 5” at the end, begin clipping the binding at the bottom inside as shown.
- Stitch the binding around the folio, mitering the corners.
- Begin and end the stitching about 5” from the center bottom of the folio.
- To make joining the ends easy, lay the left edge and trim at the right top stitching that was done in the center and trim.
- Do the same for the right binding end, trimming to the left edge stitching; this creates ¼” on each end of the binding.
- Bring the edges of the binding, right sides together and sew a ¼” seam; finger press open.
- Place the binding in place and stitch the remaining section at the bottom.
Final Steps
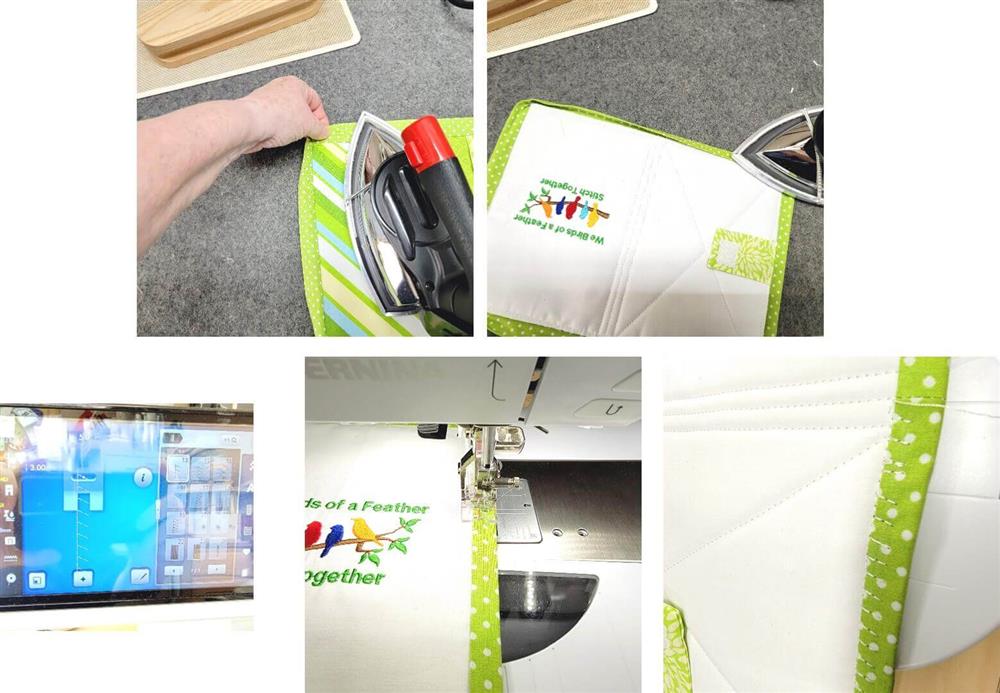
- Press the binding up and away, forming the corners; be very careful around the vinyl pockets so the vinyl doesn’t melt.
- Turn the binding to the right side and press in place just over the stitching line, mitering the corners.
- Find a decorative stitch you like on the machine and stitch the binding in place.
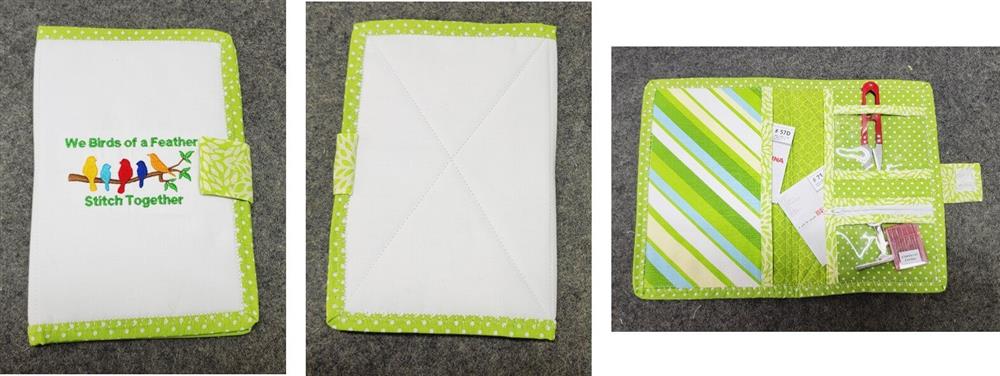
- The Stitchers Mini-Folo from the front, back, and inside.

- This mini folio is perfect for taking needed supplies to a retreat or class!
- Once you have done one, try the other two recommended designs to make mini-folios for friends who join you at stitching retreats and classes; it’s a thoughtful gift for fellow stitchers any time of year!
Conclusion
Congratulations! Whether for yourself or a gift, learning new ways to use embroidery designs increases your enjoyment of stitching. There is no doubt your project will be a “Grand Slam!”
By the "Grand Slam Designs" Team


