


What you’ll need
- 2- White Kona cotton for embroidered pocket (8" w X 7" h)
- Medium cutaway stabilizer for pocket
- 1 1/2y 44" Fabric for basket outside
- 1 1/2 y 44" Fabric for basket inside
- Embroidery thread as stated in color sequence
- 1- package double fold bias tape to coordinate with outer fabric
- Batting to sandwich between fabrics
- Sewing thread to sew on pocket and to match bias tape
- Plastic shoe box (approx. 8" w x 14" l x 5" h)
- Large piece of paper to create a pattern (24" X 30")
Featured Designs
https://www.grandslamdesigns.com/farmers-market-17-embroidery-design
https://www.grandslamdesigns.com/farmers-market-embroidery-design?variant=3
Notes
- All plastic shoe boxes vary in size, so for this project general directions are given for how the project was created.
- Adjust the dimensions to fit the plastic shoe box you use.
- Be sure to add seam allowances to all dimensions.
- Be sure to add “ease” around the shoe box when figuring the dimensions for the fabric.
Preparation

- In software or at the machine, center and position the “Farmer’s Market” design under the vegetable design.
- Add a basting line outside of the designs that will be the dimension of the finished pocket (project was 6" w x 5" h)
- For the project, the pocket is 6" w x 5" h, plus seam allowances.
- Print out the designs.
- Decide on the shoebox to be used. There are many out there, the dimensions fary as do the sides and tops.

- Measure around the bottom of the shoe box and bring up the tape measure to determine how high you’d like the sides.
- Measure the length and width of the shoe box; this gives you a starting point to make a pattern.
- The pattern paper used for this project was a sheet of packing paper.
- To get an idea of how this will all go together, place the shoebox in the middle of the pattern paper.
- Bring up a corner of the paper as the corner will be “boxed” when the project is sewn together at the corners.
- Crease along the corner; this is just a starting point.
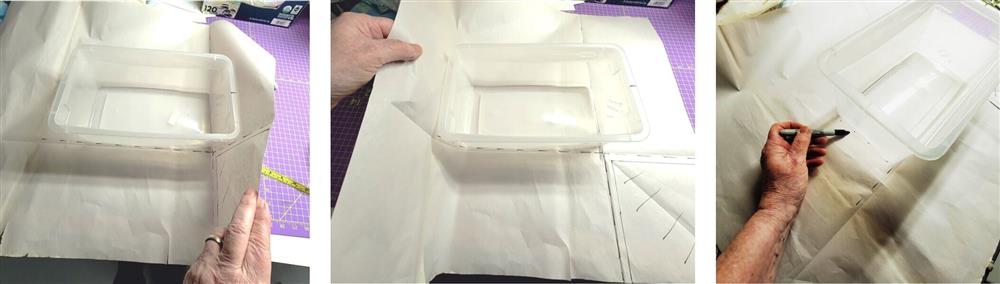
- Be sure the shoe box is centered on the paper.
- Figure out how high you want the sides of the basket.
- TIP: some box sides are straight up and down and others have a slope to them which will make the top wider than the bottom of the box.
- Using a pencil or marker, draw around the box base.

- Using a ruler, even up the traced lines.
- Make continuous lines across the paper; this will basically be the fold lines for the fabric when the basket is sewn together.
- The sides of the basket should be the same all around, so measure and mark those lines.
- For this project, the sides were measured 8” from the bottom outline of the plastic shoe box outline.
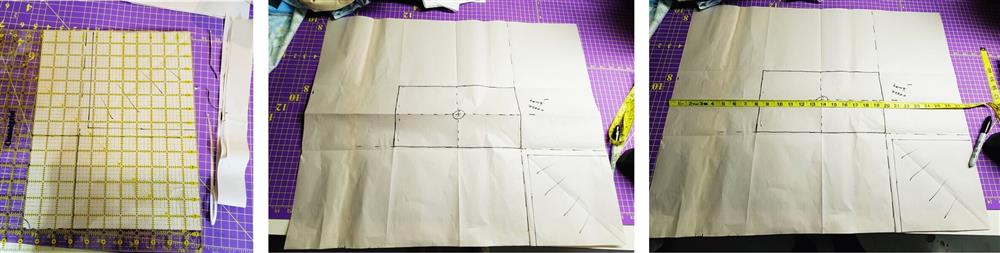
- Now use a ruler to square up the corners—don’t forget to mark the seam allowances to sew the corners together!
- The corners were marked 8” square.
- ½” seam allowances were added to the inside of the corner piece.
- The slashed lines show what will be cut away from each corner.
- Finalize the pattern by checking that ll the sides are of equal height.
Stitching

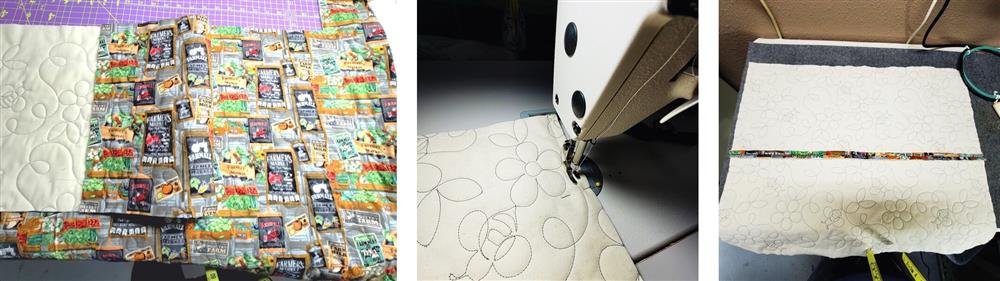
- If you have a longarm quilting machine, this is a great time to stitch a simple design over the fabric.
- Load the backing, batting, and outer basket fabrics on the machine.
- Choose a design for quilting.
- Quilt the fabrics.
- For this project, 40 wt. embroidery thread was used in the bobbin and top. The design sewed quickly.
- If you don’t have a quilting machine, sandwich the fabrics and batting and do a crosshatch design across the fabrics with the sewing machine, or even do some decorative stitching to hole the layers together.
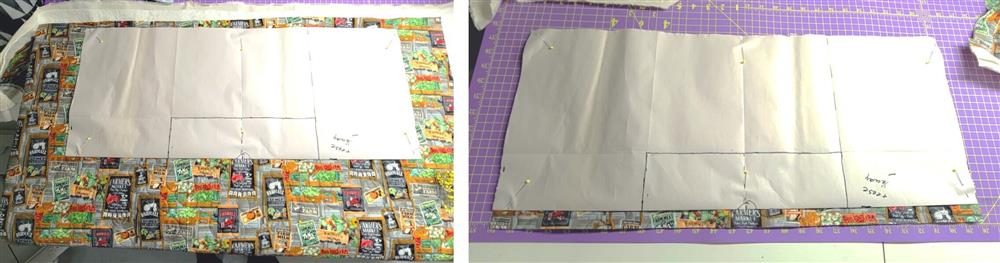
- Fold the pattern in half.
- Lay the pattern on the top half of the fabric and pin in place.
- Note: this fabric was directional, so one piece was cut with the top of the paper at the top of the fabric; the pattern had to be flipped to cut the second piece so it, too, would have the fabric pattern in the correct direction.
- For a seam at the bottom, draw a line ½” below the fold on the paper.
- Cut out around the pattern.
- Repeat cutting the second piece.
- If the fabric is directional, make sure that the tops of the basket will have the pattern of the fabric in the correct direction.
- Pin and sew the bottom seam together.
- Press the seam open.

- Cut a piece of seam binding the length of the bottom seam; press the seam binding open.
- Center the seam binding over the bottom seam.
- Place thread that matches the seam binding in the top and bobbin of the sewing machine.
- Stitch along both edges of the seam binding through all layers.
- TIP: you may need to lengthen the stitch length to 3.0mm. Also, using a walking foot on the machine may be helpful.
- Press.
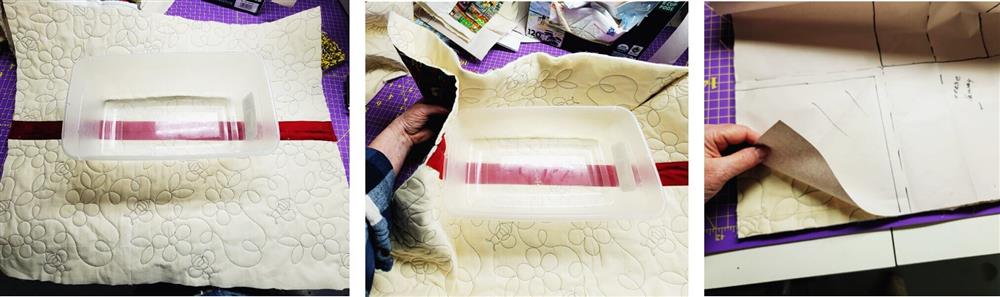
- Center the shoe box on the fabric.
- Test your plans by creating corners on the fabric; crease.
- Remove the shoe box and place the pattern corners along the creases.
- TIP: this is the time to make any adjustments before the corners are cut off to remove the bulk.

- TIP: when doing the project, it was decided more “ease” was needed around the shoebox. So instead of cutting exactly as the pattern was planned.
- The seam allowance was extended another ½”, a new line drafted for cutting, and the corner cut, making it a 7” corner cut.
- This was repeated for all corners.
- If you plan on using the pattern again, be sure to correct ALL corners, adjusting for the new cutting line.
- It is easiest to quarter fold the pattern and cut all the corners at once.

- Open the pattern, place the pattern bottom along the seam line.
- Cut the first two corners on one side.
- Flip the pattern over, again with the bottom of the pattern along the center bottom seam line.
- Pin the pattern in place and cut the corners.
- TIP: the corners cut off the fabric are the perfect size for matching pot holders! Just bind using coordinating bias binding.
Embroidery prep and hooping

- Prepare to embroider the pocket.
- Print out the template of the embroidery design as prepared.
- Starch and press the fabric well.
- Load the embroidery design on the machine and set the fabric colors.
- Hoop the stabilizer.
- Spray the fabric with temporary spray adhesive, making sure the fabric is large enough for the design, plus seam allowances to sew the pocket.
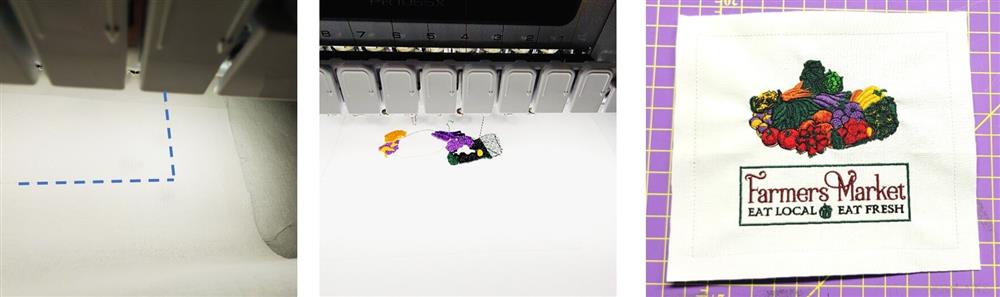
- Stitch Color 1, the tackdown line for the fabric.
- Stitch the design following the color sequence.
- Trim the fabric ½” outside of the tackdown line.

- Cut a second piece of fabric for the lining of the pocket, the same size as the embroidered fabric.
- Place right sides together.
- Stitch all around the pocket, using the placement line as a guide, and leaving an opening for turning at the bottom.
- Trim the corners to reduce bulk.
- Turn the pocket right side out, forming the corners well
- Turn in the seam allowances at the opening.
- Center the pocket on the front of the basket fabric.
- Stitch the pocket to the basket front on the left, bottom, and right sides.

- Sewing the basket corners.
- Bring each corner together, pin, and sew a ½” seam.
- Using the bias binding, cut a strip the length of the corner seam, plus ½”.
- Turn the end of the binding up ½” and pin over the seam, beginning at the corner.
- Stitch the binding to the seam, meeting cut edges.
- Flip the binding over the seam and sew down the folded edge.
- Repeat for the remaining three corners.
Final Steps
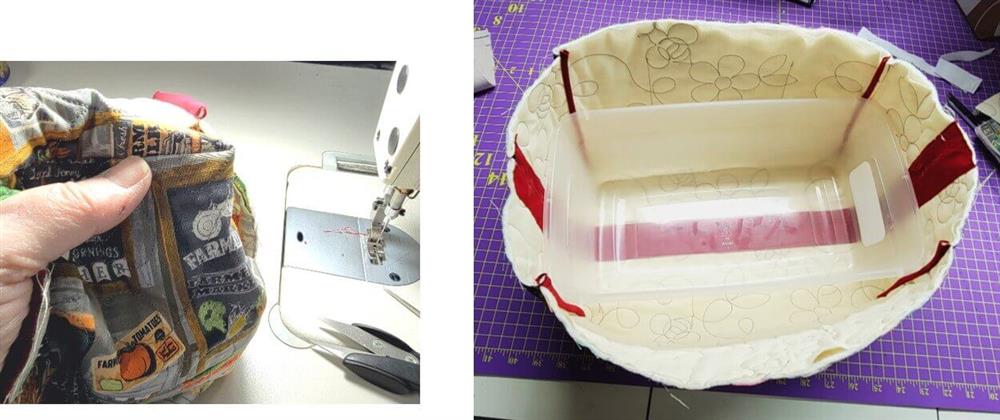
- Turn the basket, right side out, forming the corners well.
- Insert the plastic shoe box; it should fit nicely with a bit of ease around all the edges.
- Remove the plastic shoe box to complete the basket sewing.
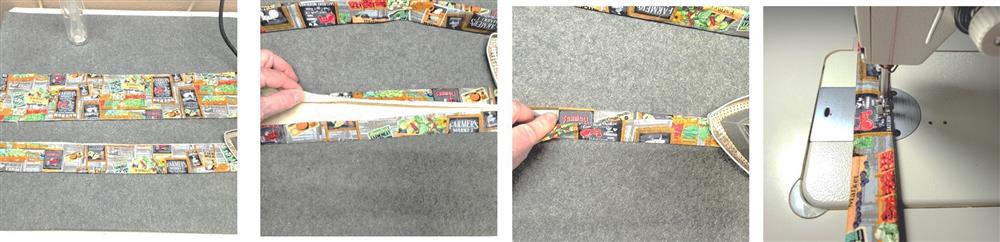
- To make the handles, cut the extra quilted fabric 5” w and the length of the handle from corner to corner.
- For the project, the handles were cut 5”wide x 25” long.
- Press the long edges toward the center.
- Press the folded long edges together.
- Top stitch along both long edges.
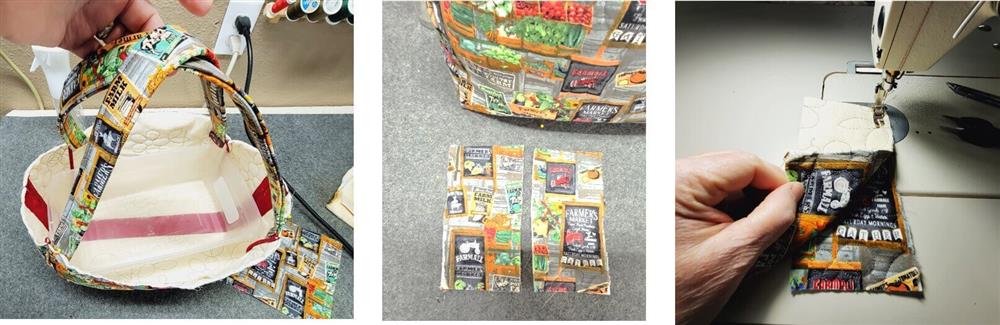
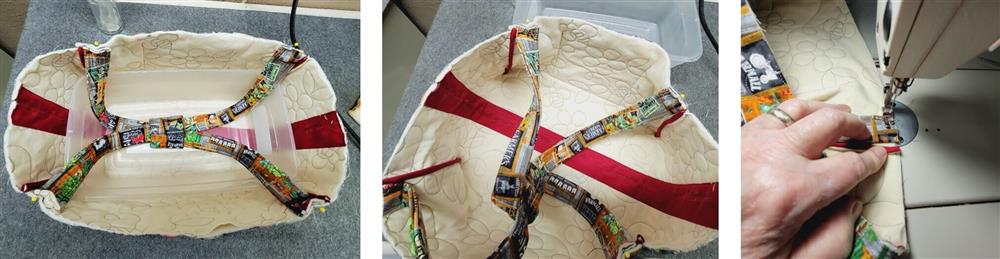
- With cut edges matching from the inside of the basket, pin the edges of the handles at each corner of the basket, crossing at the top.
- To make the handle part, cut two pieces of extra quilted fabric 3.5” wide by 7” long.
- Place the fabrics, right sides together, and sew along each long side.
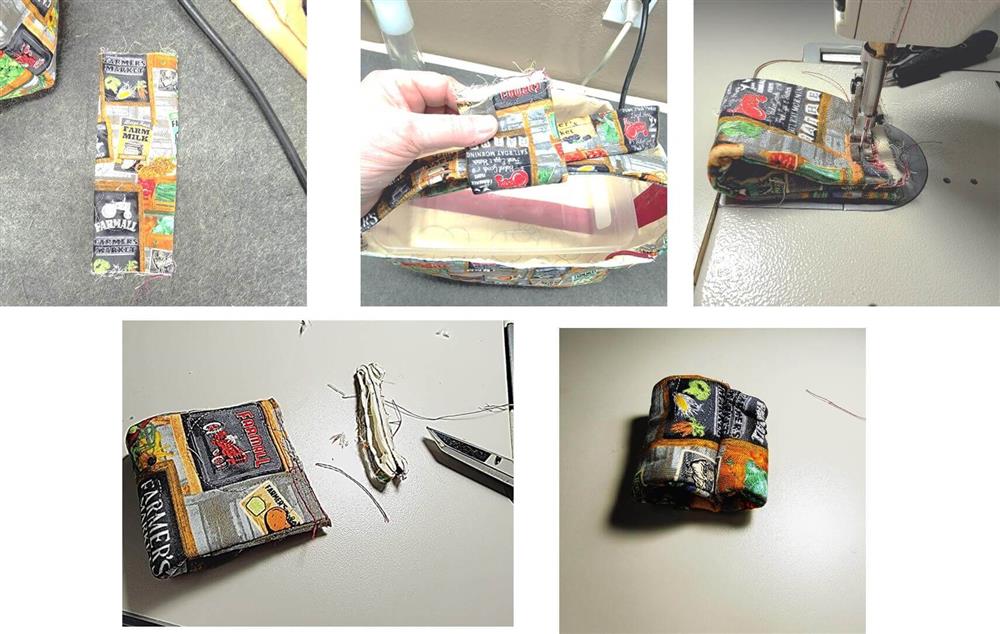
- Turn the piece right side out.
- Press.
- Fold the piece in half and stitch a ½” seam allowance along the short cut edge.
- Stitch again ¼” away.
- Trim the seam close to the last seam.
- Turn the handle right side out.
- Remove the pins on one side of the basket and slip the ends of the handles through the handle just made.
- Pin the handles back in place, making sure they remain crossed.
- Sew the handles in place at each corner; double stitch for added security.

- Using the remaining bias tape, sandwich the top of the basket inside the bias tape.
- Begin at one of the side seams, leaving ½” for a seam allowance, pin the bias tape in place.
- At the other end, add ½” for a seam allowance and trim the bias tape.

- Stitch the ends together at the side seam using a ½” seam.
- Match the bias seam to the side seam.
- Pin the bias tape in place.
- Top stitch the binding in place with three rows, catching the ends of the handles.
- Press the seam binding.

- Bring the handles up at the inside of the basket and stitch them in place through the binding.
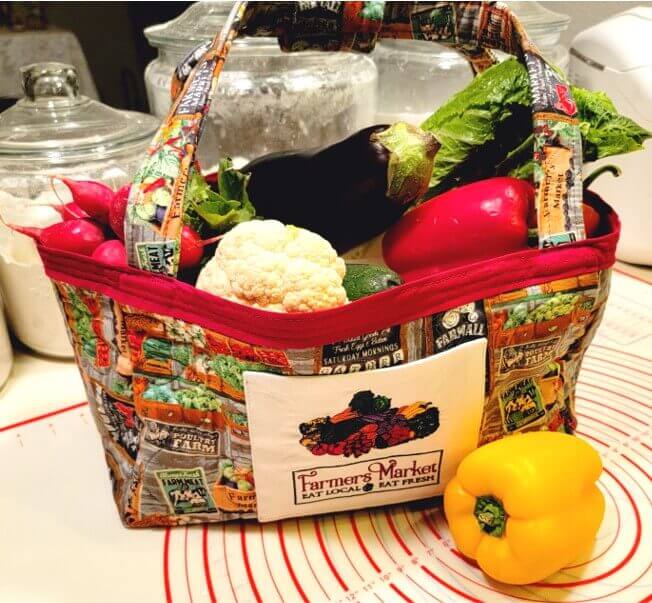
- Because market vegetables can make the basket heavy, do two or three rows of stitching to make sure the handles will securely hold the basket contents when filled.
- Repeat for all the handles at each corner.

- Thoroughly wash and sanitize the plastic shoe box.
- Insert the box into the basket.
- Be sure to wash the plastic box after each use, and the fabric basket as necessary.
By the "Grand Slam Designs" Team

