


What you’ll need:
Measure the pillow to determine the amount of fabric needed.
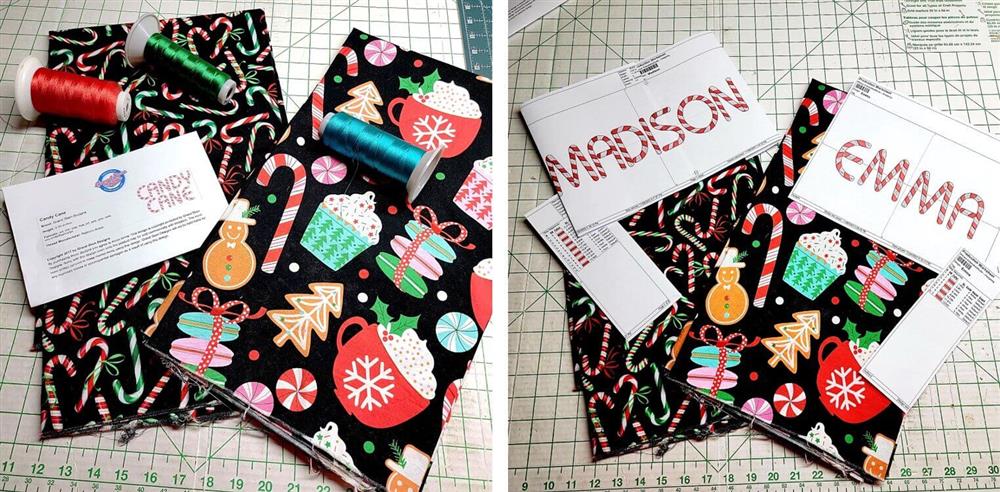
For this project here is what was used:
Main Fabric: 40” wide x 24” long fun kids’ pillowcase cotton
White Cuff Fabric: 14” high by 40” wide cotton
Lightweight fusible knit interfacing: 14” x 40” to line cuff fabric
Red Trim Fabric: 40” long x 2” high cotton
Red and White embroidery thread
Sewing thread to coordinate with fabric
Printout of name at 100%
Featured Designs:
https://www.grandslamdesigns.com/candy-cane-50-embroidery-alphabet?variant=1
Other fonts that will work:
https://www.grandslamdesigns.com/fun-2-embroidery-font-set
https://www.grandslamdesigns.com/paint-13-embroidery-font-set
Notes:
- The names are set up first either at the machine or in software. These are fonts—not keyboard lettering in software. Each letter is imported and then the letters are aligned and spaced to make the name. Do print out a paper template of each name; these templates will be used for alignment and stitching the pillowcase cuff.
- The girls for whom these pillowcases are made were given a choice of one fabric or the other. Of course, they both chose the cupcake and cocoa fabric! So the solution? Cut the length, add a seam allowance to the width measurement, split the fabric in half in width so that each pillowcase has the name on both sides so they can use either the candy cane or the cupcakes and cocoa side of the fabric each night. When done this way, there will be three seams created at the left, right, and bottom. If only one fabric is used, then only one seam on the side on the left and the bottom seams are needed.
- The candy cane lettering doesn’t necessarily need to be red and white. Other choices would be colors that are in the fabrics—let the children choose the colors and really make them their own.
Preparation:
- Prewash the fabrics. This will soften the fabrics and if there would be any color loss, it will come out in the wash. These fabrics washed up beautifully with no color loss. Another reason to wash the fabrics is to make sure there are no chemicals in the fabrics when working on them and for the children using them.
- Fuse the lightweight interfacing to the white cotton fabric for the cuff, following the manufacturers’ directions.
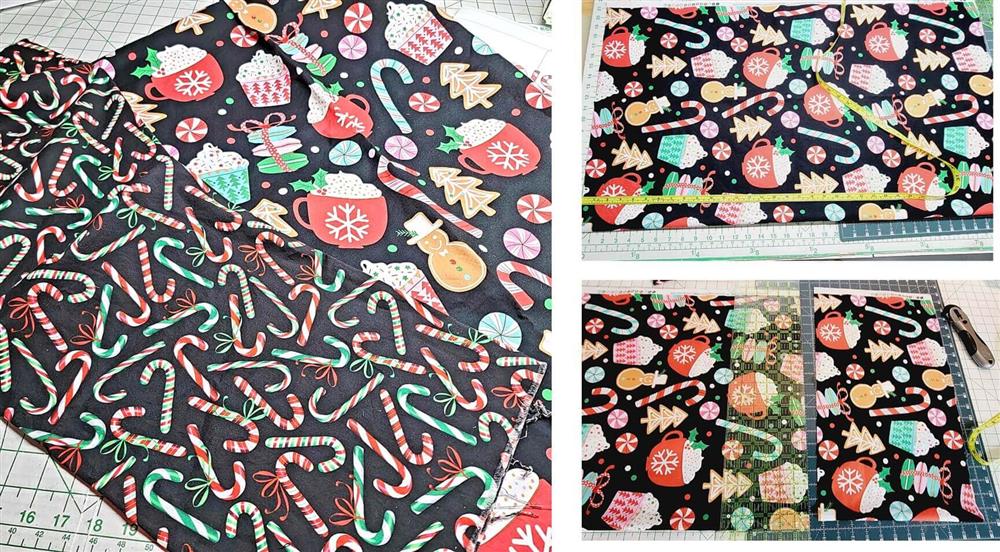
- Cut the fabrics to size—remember to measure the pillow you have and leave plenty of ease so the cases will slip on and off the pillow easily.
- For this project, the length was cut to size, and the width was cut to size, plus a seam allowance so the two pieces could be sewn together on the right side.
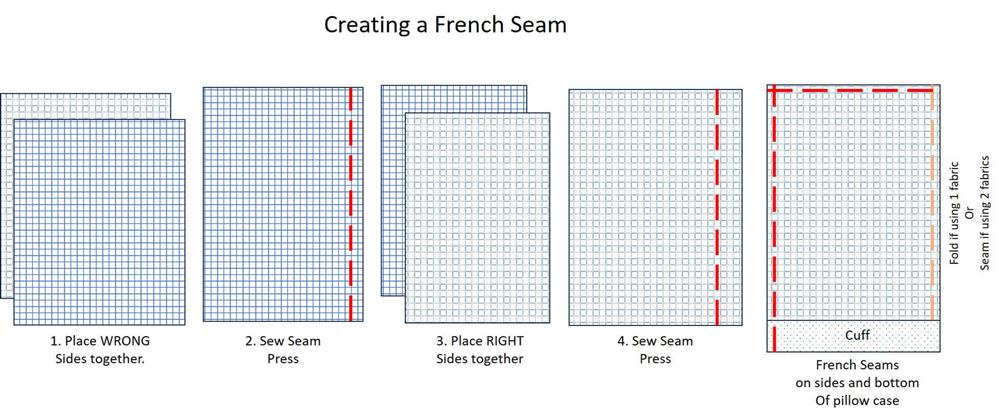
- French seams were used. If you have never sewn a French seam, they are very easy. The reason to use a French seam is to encase the raw edge of the fabric to prevent raveling and make the inside of the pillowcase look professionally finished.
- To do a French seam, place WRONG sides of the fabric together, meeting cut edges. Sew a ¼” seam. Press the seam open and then place RIGHT sides of the fabric and press right along the seam line. Now stitch 3/8” away from that pressed edge. Press the seam, turn the fabric to the right side and press the seam toward the back. This completes the seam.
- This is not a “fine” French seam, but rather a French constructed seam that will hold up to the use and washing of a pillowcase.

- Remember to begin sewing a French seam with wrong sides together. So now whether a fold is used because there is only one fabric, or a seam was sewn because two fabrics are being used, the rest of the steps are the same.
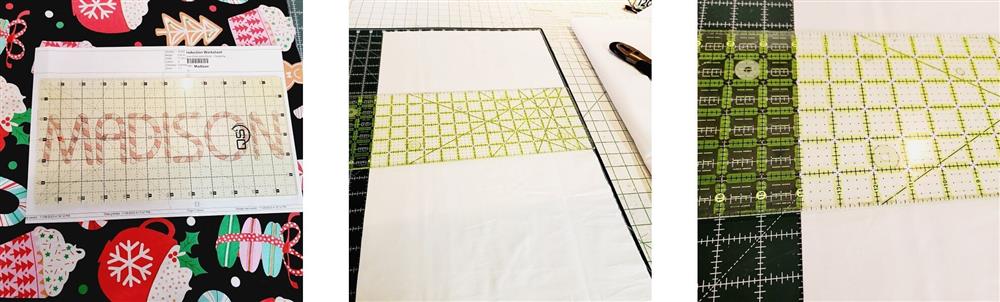
- Measure the name that was printed out. Determine the depth of the cuff. For this project, the cuff was cut 14” high by the width of the main fabric (40”).
- The name needs to be centered on the fabric.
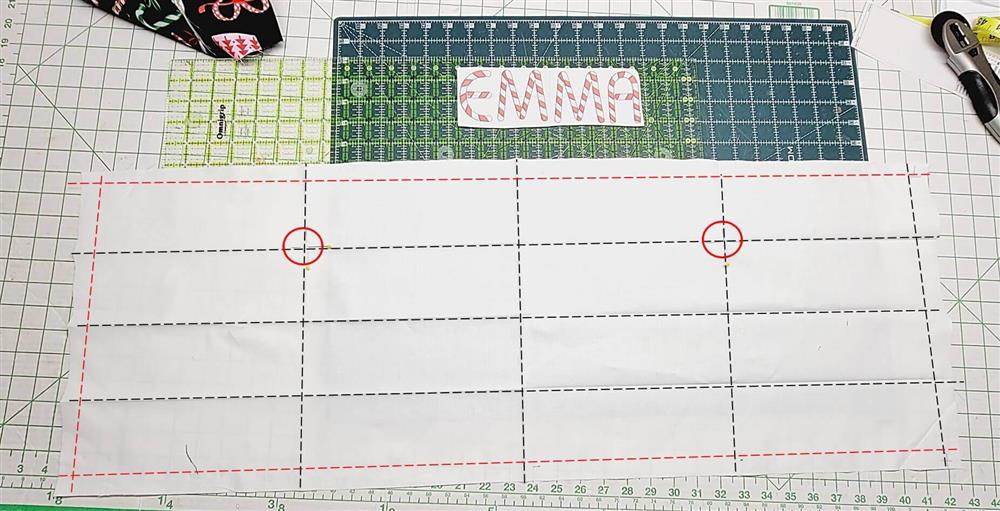
- The cuff fabric was folded in half meeting long edges and creased (horizontal middle line).
- Then the fabric was folded in half, short sided together and creased (vertical center line). To find the center of the finished area to stitch the name, the seam allowances were marked (red dotted lines).
- The first length fold (horizontal center fold) was brought to the top seam (red) line at the top and a crease made.
- Then each short side seam line was brought to the middle vertical line and a crease made.
- Where the circles are is where the center of the name will be centered on each side of the cuff.
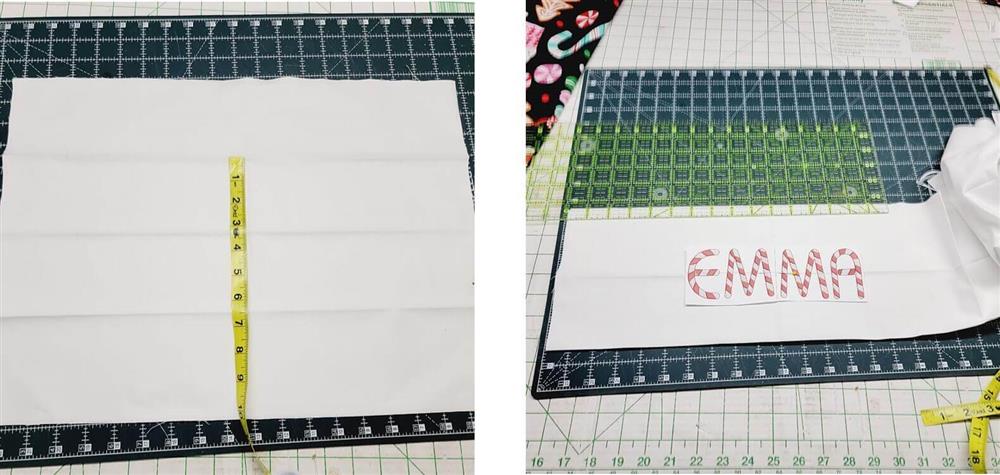
- For this project, the lines measured 3.5” apart.
- Trim around the paper template and then center it on the creased lines, using the crosshairs on the template to aid in alignment to the crease lines on the fabric; pin the template in place.
- Here the fabric is folded in half as it will be sewn to the main fabric just to double check the placement.
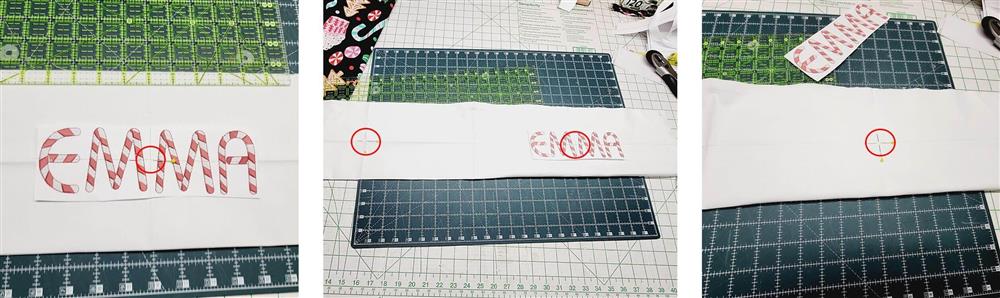
- Because two fabrics were used for the pillow case, it was decided to put the name on each side.
- The circles represent the center of the design on the fabric for placement.
- After double checking the placement, pins marked the placement.
Machine prep and hooping:

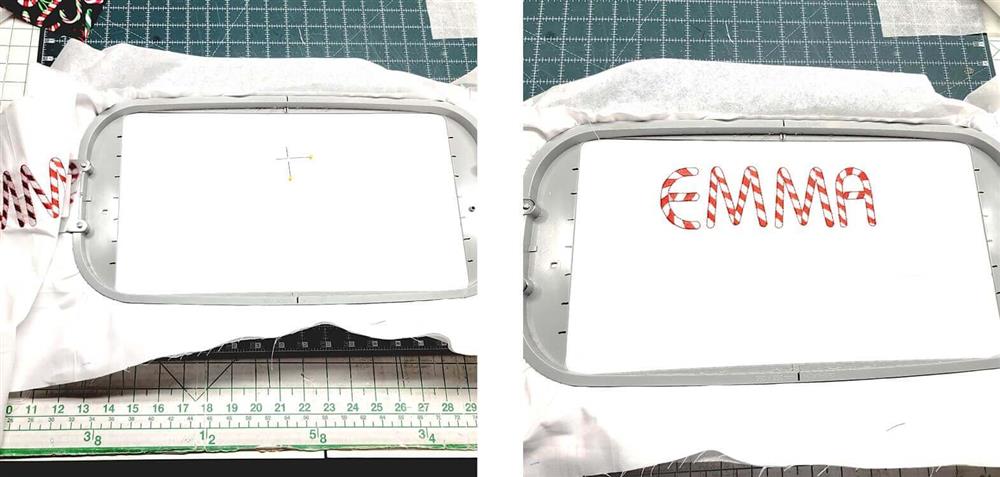
- Hoop the fabric with a layer of tearaway stabilizer. These letters are large, so a larger hoop was needed—even this short name would not fit in the 5x7 hoop.
- Load the design on the machine and center the needle over the crossmarked pins. Load the embroidery thread and then set the thread colors.
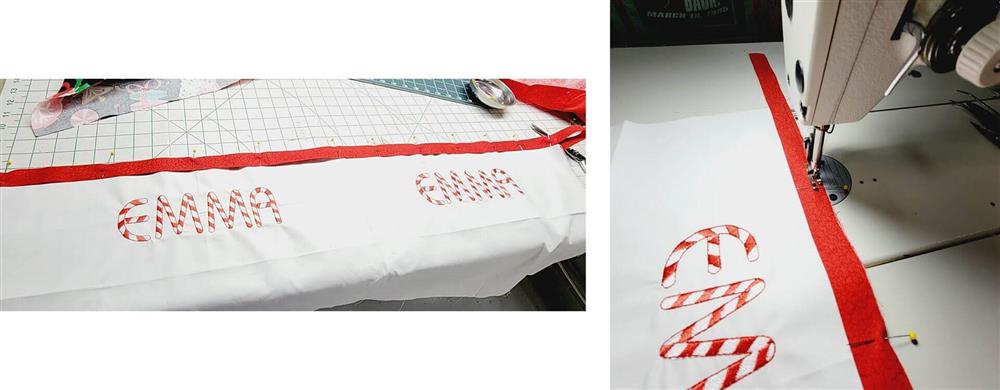
Stitching:

- Stitch the name with the chosen thread colors. Remove the excess stabilizer.
- If the name is being stitched on both sides of the cuff, hoop and stitch the name again; remove the excess stabilizer.
Cuff:

- Fold the cuff in half along the center horizontal like as it was pressed.
- If you’d like, a little colorful band may be added.
- Cut a 2” wide by the width of the fabric and then press it in half lengthwise.
- Meeting the cut edges, pin the band to the top of the cuff edge.
- Baste the band in place using a ¼” seam.

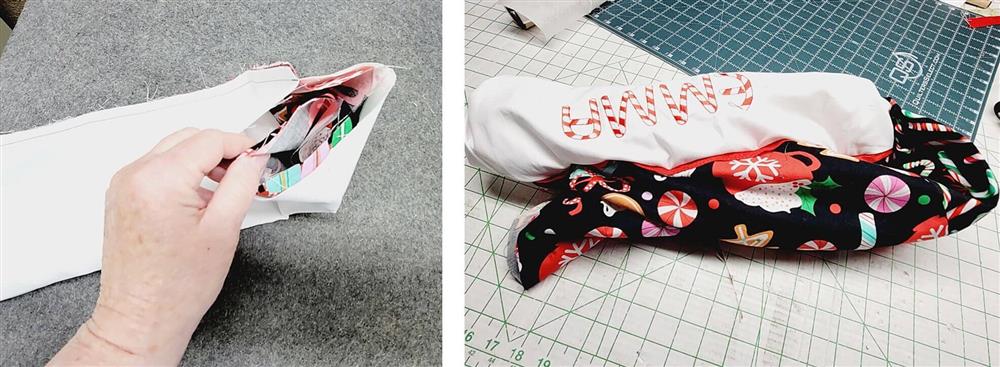
- Place the cuff on the table and then the main fabric as shown.
- The cuff fabric is opened up (not folded in half).
- The “Burrito” method of construction will be used to encase the cuff seam entirely to create a beautiful interior finished at that seam.
- To do this, place the top cuff edge, right sides together, along the lower main fabric seam; pin the two edges together as shown.
- If you’d like, you can baste these edges together. This is not a necessary step but for a beginner it may be helpful.

- With the cuff totally unfolded, roll up the main fabric as shown.
- Bring the bottom cut edge of the cuff, up and over the rolled main fabric and pin to the edge that was basted, meeting cut edges.

- Sew a ½” seam.
- Press the seam.
Final Steps:
- The main fabric has been encased inside the cuff.
- Reach in one open side of the cuff and pull out the main fabric.
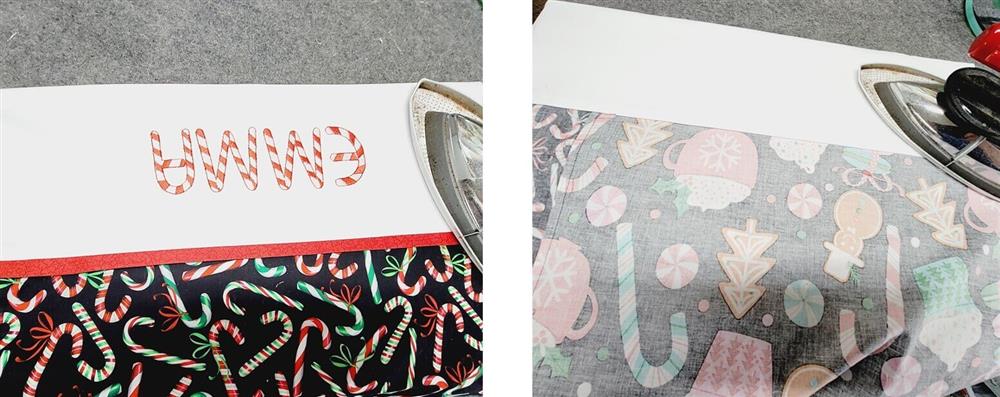
- Press everything well.
- On the right side, the little red flange will want to pop toward the main fabric.
- Be sure the back seam is pressed downward nice and flat.
- After the seams are pressed, then press the final crease at the fold of the cuff.

- Now use the instructions to sew French seams first along the long edge; be sure to match the seams lines at the cuff.

- To finish, use the French seam to sew the bottom of the pillowcase closed, The previous seam(s) should be pressed toward the center of the back of the pillowcase.
- This will create beautiful, pointed corners!
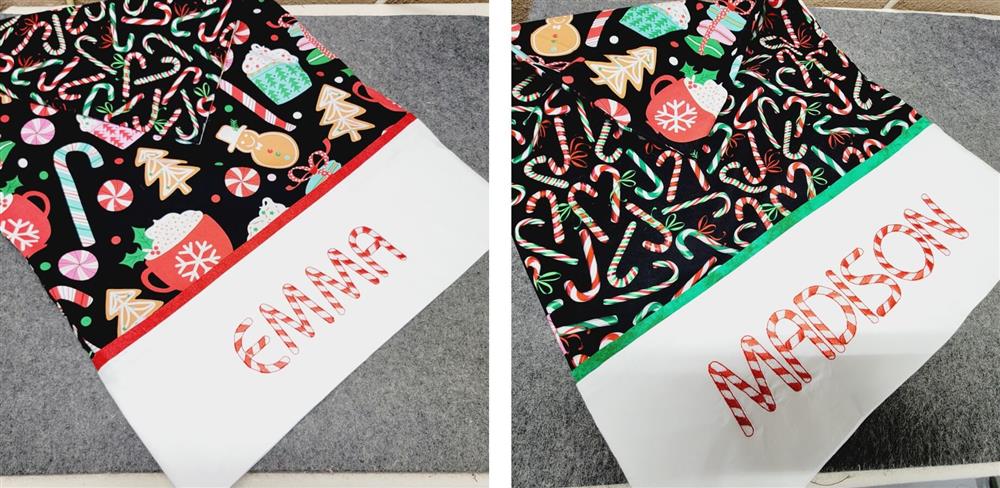
- After doing the first pillowcase, you’ll find doing the next one or one hundred easy to do. Children absolutely love these personalized pillowcases for the holiday season!
- Idea: use the other recommended fonts to create seasonal pillowcases for other holidays such as Easter, in fun patriotic fabrics for the summer, and glow in the dark thread for the name for a Halloween themed pillowcase. You’ll have as much fun stitching these as the children will have using them.
Conclusion:
Congratulations! Whether for yourself or a gift, learning new ways to use designs increases your enjoyment of stitching. There is no doubt your project will be a “Grand Slam!”
By the “Grand Slam Designs” Team
By the "Grand Slam Designs" Team


