


What you’ll need
- Fabric-for this project, an old wedding dress was used
- Quiltsmart Wedding Ring Printed Interfacing
- Embroidery thread
- Poly mesh stabilizer
- Batting
- Sewing thread
- Poly fil to stuff the pillow
Featured Design
https://www.grandslamdesigns.com/with-this-ring-2-embroidery-design?variant=1
Other designs which would work well
https://www.grandslamdesigns.com/mr-and-mrs-7-embroidery-design
https://www.grandslamdesigns.com/wedding-love-embroidery-design
Notes
- There are many ways to make a wedding ring quilt pattern
- There are templates, printed patterns, etc.
- The wedding ring pattern may be made from scraps, strips of fabric, embroidered pieces, etc.
- Quiltsmart printed interfacing was used for this project.
- Look on YouTube for their channel and further instructions on how to use this product: https://www.youtube.com/watch?v=8RJUYCylcmA
Preparation

- When deciding on how to proceed with this project, there were many choices from using strips of fabric with acrylic templates, to the design done in-the-hoop with machine embroidery.
- In the closet hung this beautiful old gown which called out to be repurposed into this project.
- The fabric was a champaign color with an embroidered floral design.
- There were two choices of trim on the gown, but the one shown seemed to be the best choice to frame the wedding ring pattern.
- Print out a template of the embroidery design.

- To begin, the fabric was analyzed to determine which areas would be best for which use.
- The lining fabric under the embroidered fabric was perfect for the top and back of the fabric.
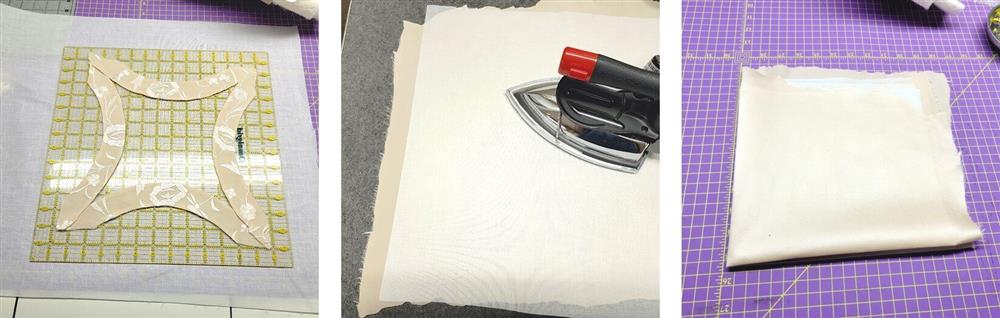
- The fabric was pressed with a dry iron.
- The embroidered fabric was analyzed to see which parts of the design would be suitable for the “rings”.
- In looking at the fabric, it was decided that instead of cutting apart pieces to be sewn back together again, sections of the embroidery would form each ring section as you will see.

- Four sections of the printed Quiltsmart interfacing were cut away.
- The interfacing sections were laid, adhesive side up, on the right side of the selected sections of the embroidery; the goal was to select sections which would extend from end to end of the interfacing, with a large flower close to the middle.
- The interfacing pieces were pinned in place and roughly cut out.
- Following the Quiltsmart interfacing instructions, stit hing was done on the solid line at the outer and inner arcs, leaving both ends open.
The interfacing was then cut just outside the dotted cutting line. Because of the embroidery, the cutting was done leaving about a ¼” seam allowance.
- As instructed, a tube turner was used to turn the interfaced fabric, and pressed.

- Repeat for all sections.
- A seam ripper was used to carefully remove the selected trim.
- As you can see, the trim had very long and short sections.
- The trim was pressed with a little spray starch.

- The trim was cut even with the shorted section of the trim.
- Using a large square ruler, the pieces of the ring were laid out to help determine how large the front and back sections of fabric and batting needed to be cut
- The fabric was cut 4” larger all the way around so there was ample to work with when constructing the pillow.
- The pillow front was backed with a lightweight fusible interfacing.
- The fabric was quarter folded and lightly creased to find the center and aid in aligning the embroidery design and rings.
Stitching

- Cut out around the printed template and center it in the middle of the pillow top.
- Test fit the ring pieces on the pillow top around the template.
- On the underside of the interfacing is a center line which needs to be aligned with the crease on each piece.
- Now you’ll begin to see how things will come together.

- The trim may also be test-fit.
- Decide on the embroidery thread colors which will enhance the fabric.
- The colors may be chosen to coordinate with the fabric and/or the colors of the bridal party.
- Center and hoop the fabric with a piece of poly mesh stabilizer.
- Hoop the fabric firmly, but not too tightly so as to cause fabric burn.

- Load the design on the machine and load the chosen thread colors.
- Remove the template and stitch the design following the color sequence.
- Tip: when stitching on delicate fabrics, slow the machine way down.
- After the design has stitched, loosen the screw on the hoop and remove the fabric.
- Trim away the excess stabilizer.
Rings

- Layout the rings as planned.
- The corners should align as indicated by the printing on the back side of the interfacing.
- Pin the sections together at the joining area.

- To help retain the shape, at the sewing machine stitch across the line, backstitching at the joining point of the rings.
- Press the end of the joined rings back along the stitching line; this line should be straight.

- Press the embroidered pillow top so all but a faint crease line shows.
- Align the rings along the creases as was planned and pin in place.
- Because this fabric was cut along the bias to get the embroidered sections within each ring, there was some rippling of the fabric.
- The fabric was eased into submission with pressing and a clapper used to flatten the heated fabric so it would lie flat.
- The sections were pinned in place.
- At the joined intersections, the fabric that was pressed back at the ends was trimmed, leaving a scan `1/4” seam allowance.

- Load the sewing machine with the chosen thread color, it can match the fabric or be invisible thread which was used for this step in the project. The bobbin held a thread color to match the fabric.
- Choose the stitch type you’d like such as a blanket stitch.
- For this project, a very small zig-zag stitch was used so it would barely catch the edge of the fabric.
- The inner ring edges were stitched first, and then the outer ring edges.
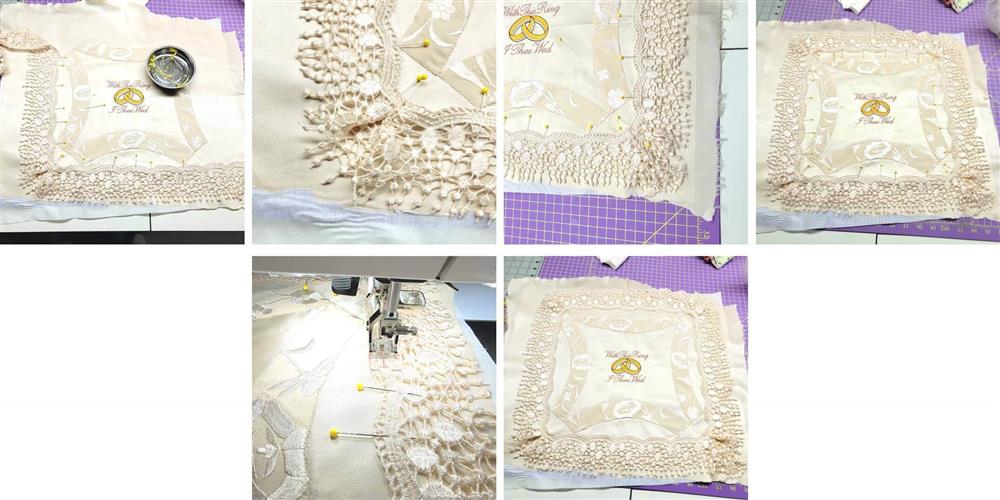
- The lace trim was pinned in place as planned, and a small box pleat was formed at each corner.
- At the last corner, edges were tucked under to form the pleat and hand stitches were done to sew the pleat together in the final steps.
- The monofilament thread was used to straight stitch the lace in place following the pattern of the lace at the top.
- Choose the monofilament or choose a color to match the lace.
Final Steps

- To force the lace over the edge of the final pillow, a pencil was used to determine where the cutting line of the fabric would be.
- Small tick marks were made in the same position along all four sides of the lace.
- The lace was pinned back and a rotary cutter and ruler were used to cut along the lines on all sides.
- The cut was double checked to make sure there would be enough lace hanging over the pillow edge after the seam allowance was sewn.

- The lace was pinned to the inside of the pillow so it would be out of the way.
- A piece of batting was cut the same size as the pillow top and pinned in place.
- The layers were basted together.
- A small jar was used to trace around, then cut, at the corner to slightly round the edges.

- A remaining piece of lining was used to cut the same size as the pillow top.
- A piece of batting was cut the same size as the back lining piece.
- With the pillow top facing up on the cutting surface, the right side of the lining was placed on top and the batting placed over that.
- All the edges were pinned together and sewn using a 3/8” seam allowance; be sure to leave an opening at the bottom for turning.
- Turn the pillow right side out through the opening and form the corners well.
- Press along the seam allowance, using your fingers to roll the seam as you go.

- Stuff the pillow with the poly-fill; do not stuff too firmly.
- Turn in the seam allowances at the opening, pin and hand stitch closed.
- At the corner where the trimmed ends met, hand tack the lace edges together and then trim away any excess so this corner matches the others.
- This is a novel way to use an otherwise discarded dress.

Conclusion:
Congratulations! Whether for yourself or a gift, learning new ways to use embroidery designs increases your enjoyment of stitching. There is no doubt your project will be a “Grand Slam!”
By the "Grand Slam Designs" Team


